Building a Client Portal From Notion Databases Without Coding: A Step-by-Step Guide
No more endless email chains, calls and meetings for status updates on projects and adding new notes. Simplify project and task management for your clients with NotionApps. Create a custom client portal for project tracking, feedback, and resource access. With drag-and-drop tools, real-time updates, and full customization, ensure seamless communication and accessibility on any device. Build a resource hub with articles and FAQs, empowering clients to self-serve. Enhance your workflow and client relationships with NotionApps.
If you're looking to create a client portal where your clients can log in and access their projects and tasks without constant follow-ups, you're in the right place! NotionApps enables you to build a no-code client portal app directly from your Notion databases, offering a seamless and efficient solution for managing client communication.
For companies using Notion as their information hub to share data with clients, the lack of an app-like interface and detailed database permissions can be limiting. Clients care deeply about work visibility and their overall experience, and while Notion is an excellent productivity and project management tool, it doesn't naturally serve as a client portal.
With NotionApps, you can overcome these limitations by transforming your Notion databases into a fully functional client portal app. Build an app with both desktop and mobile view, where your clients can manage their projects, request new ones, give feedback, and access essential resources.
Step 0. Setting up a free NotionApps account:
To begin building apps with NotionApps, start by connecting your Notion account. Follow these steps:
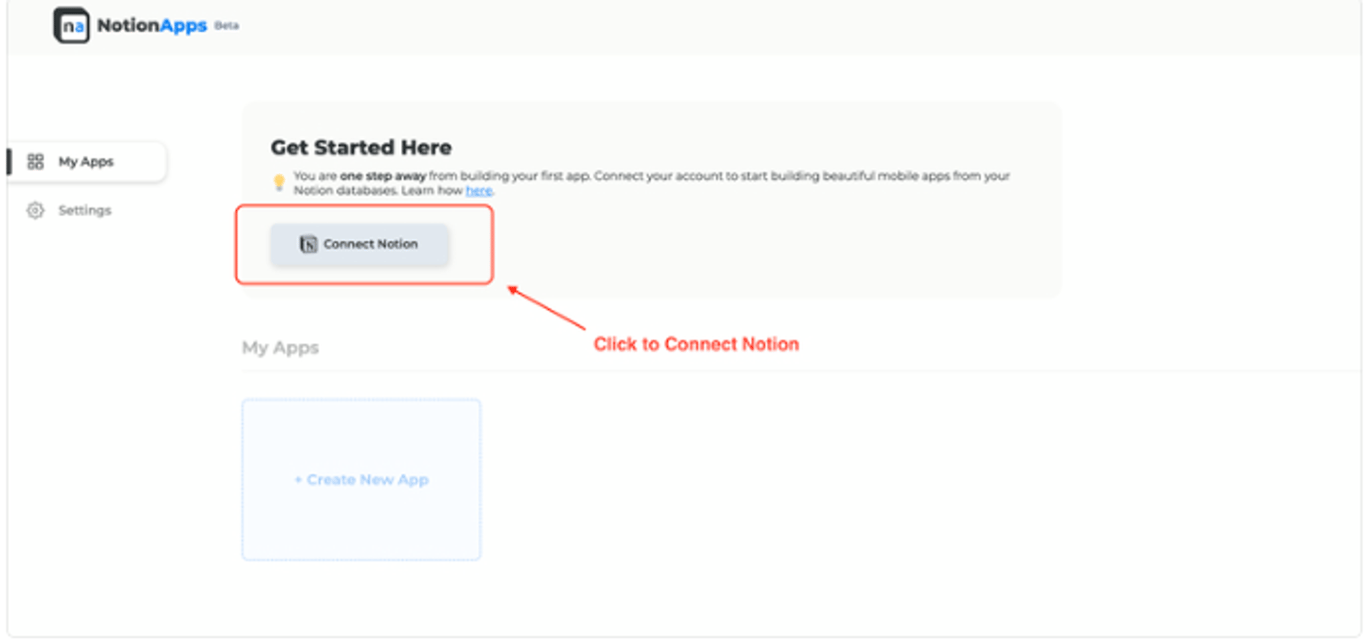
Once signed up, you'll land on the home page. If not redirected, click here.
On the home page, find and click the "Connect Notion" button. This action will take you to the Notion Authorization page.
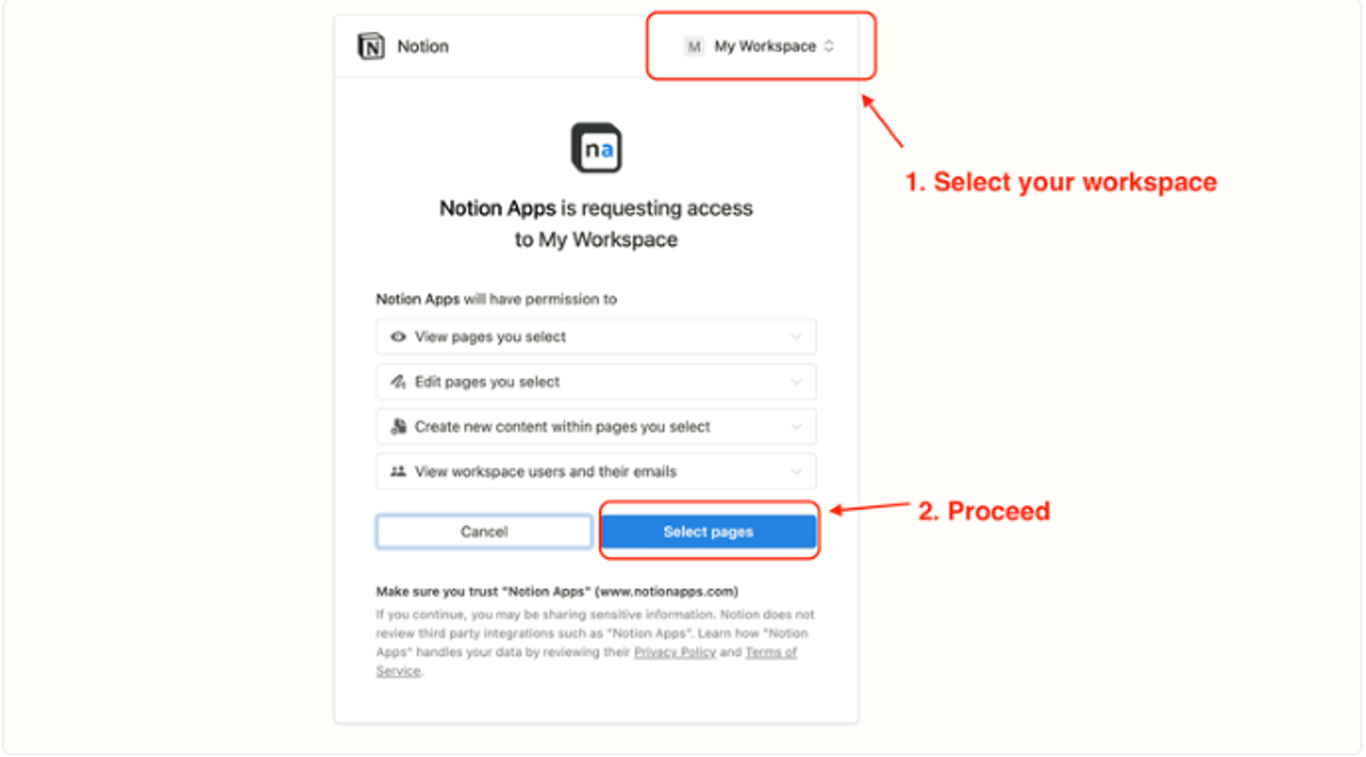
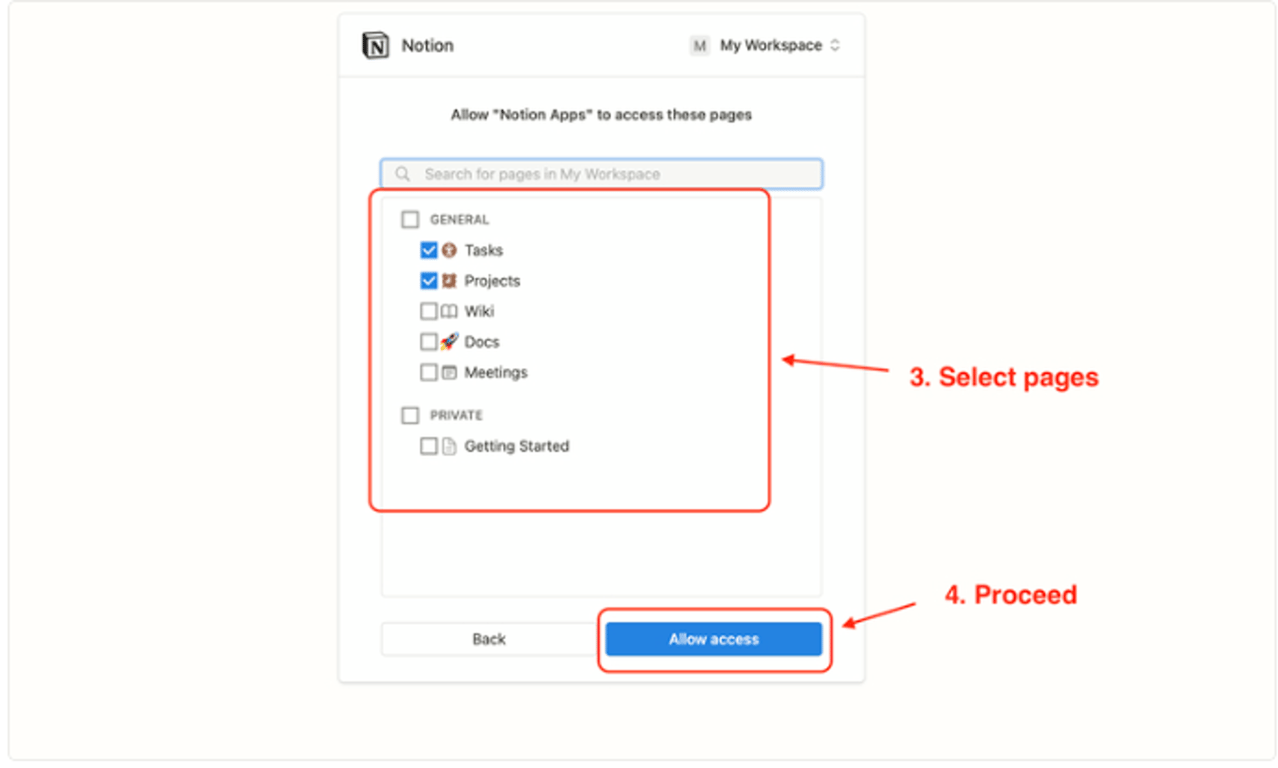
Choose the workspace and top-level pages on the Notion Authorization page that include the databases you intend to utilize for creating apps.
Grant access to your Notion account by clicking the "Allow Access" button.
That's it! With these steps, you should now be able to connect your Notion database(s) and start creating apps.
Step 1. Creating Your App:
NotionApps offers a straightforward process for creating your client portal app. You can either link an existing database or clone a pre-built app template.
Link Your Existing Database: To create a new app, click the "Create New App" button on the homepage, which will take you to the "Create New App" page. Here, select the databases you want to use for your app. If a database doesn't appear, it may still be syncing—wait 1-2 minutes and click "Refresh." After selecting the databases, click the "Build App" button to create and access your new app. Now, you can customize your app by adding screens, filters, sorting options, and more. For a video tutorial, use this link.
Clone an App Template:
Select an app template- Go to the App Templates section to browse the available pre-built apps. Choose the “Client Portal” app template if you want to build a client portal.
Duplicate the template- Before you clone the app, you will be prompted to duplicate the Notion template. It will copy the app’s data into your Notion account.
Connect the template- Click "Connect Notion Template", search and select "Client Portal". If you still don’t see the Notion template, go back and make sure you duplicated it into your workspace.
Clone the app- Select the "Client Portal" Notion template and click on "Clone App" to complete the process. Tada! The app is now yours to customize.
Tada! The app is now yours to customize.
Step 2: Ready your Notion data
If you created your app by cloning the App Template, you can easily modify the database to fit your needs. The Client Portal template includes databases such as Clients, Team, Invoices, Projects, Tasks, Resources, and Testimonials. You can add, edit, or delete databases as required.
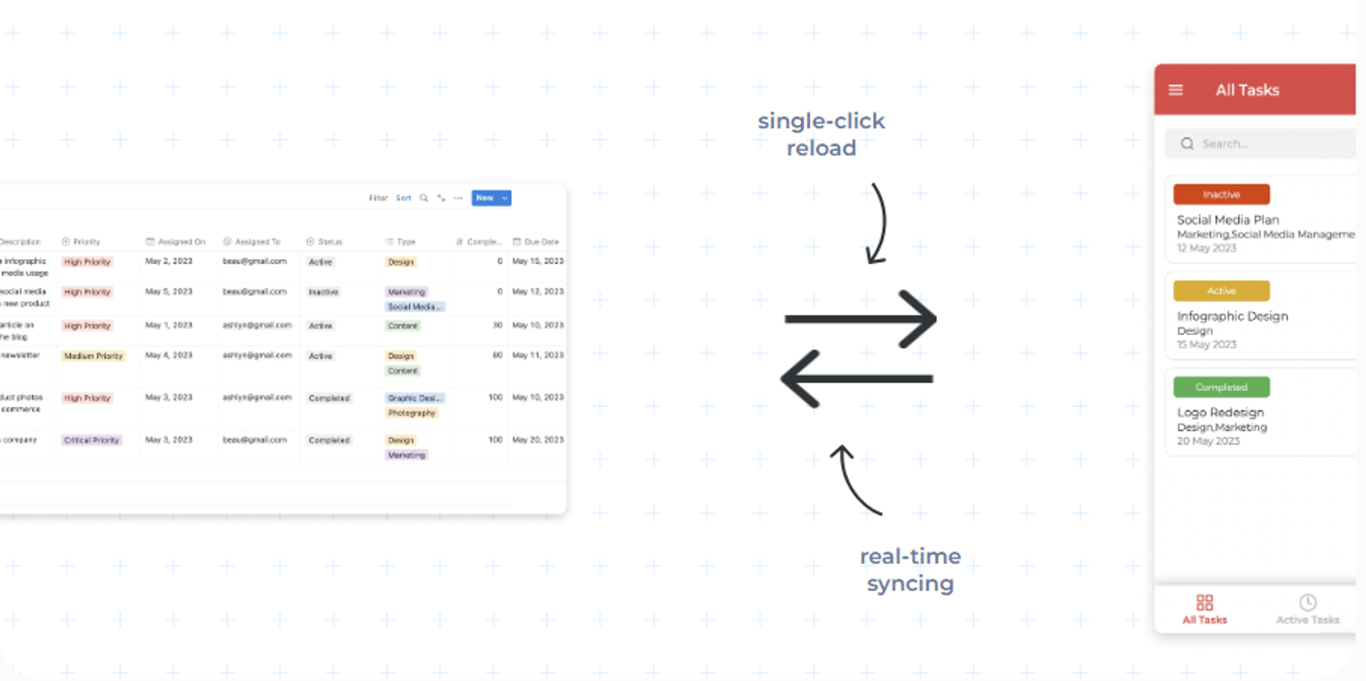
When you make changes to your Notion database—such as adding new items, updating existing ones, or adding new properties—you need to reload the data in NotionApps to see the latest updates.
Reloading the data is quick and simple. To do this, click the "Reload" button in the top bar of the app builder. This will retrieve the latest data from your Notion database.
💡
Note that, the data modified on the app is synced in real time into your Notion databases. The “Reload data” feature is to sync the changes you do on Notion into your apps.
ℹ️
If you want to reload data directly from the application, please read how to do it here, Reload Data (from app).
Step 3. Customize App: The Basics
Now that we've created our databases, it's time to explore how to customize the app's functionality to perfectly suit your needs. In this step, we will talk about the basics of customizing your app according to your brand and personalizing how your data is viewed and interacted with in the app.
App Builder
The App Builder is the primary workspace where you can customize and design your app to meet specific needs and preferences. To start customizing, navigate to the home page and click on the app you wish to modify. This will open your app in the App Builder interface, providing you with a range of tools and options to create a user-friendly and intuitive app. Within the App Builder, you can add and customize screens, add different components, set component and screen visibility, configure app navigation, and so much more.
In the app builder, you can switch between mobile, desktop, and expanded previews for your application.
While the full-width desktop view is the default on larger devices, you can configure the app to show a mobile view. To do this, go to the app builder, navigate to app settings, enable "Show mobile view on desktop," and publish your app. Now, it will display in mobile view on laptops and other larger devices.
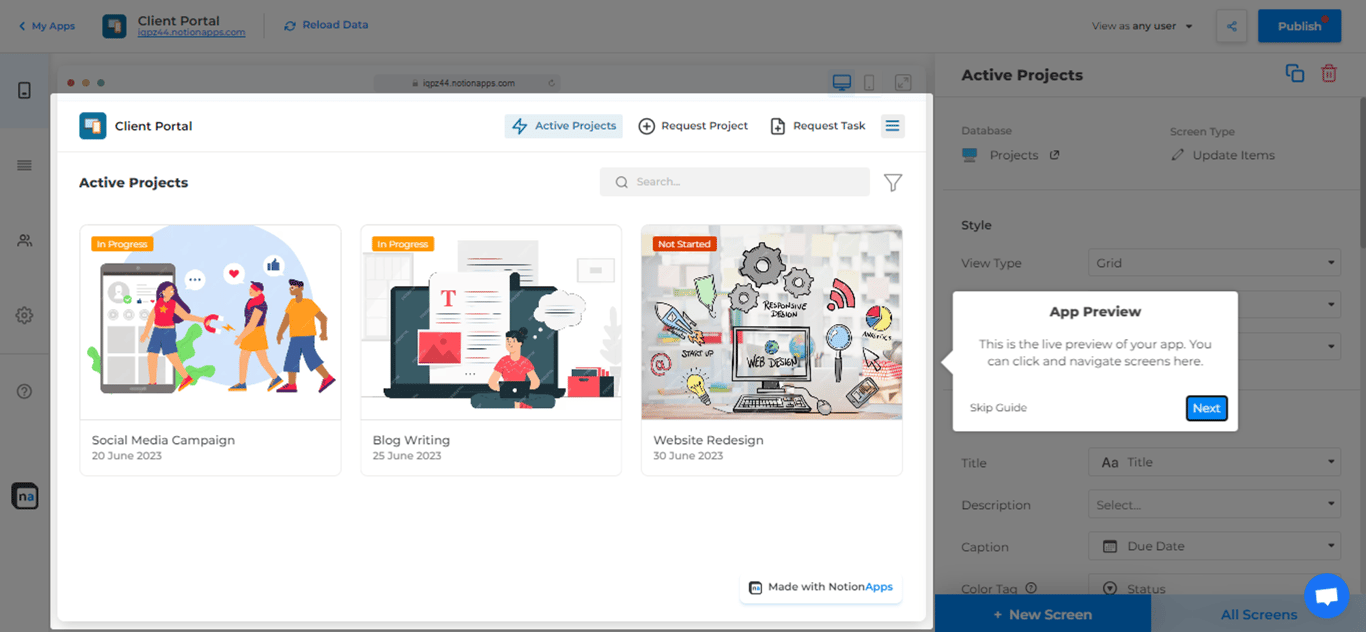
App Preview
The App Preview is the preview area in the center of the app builder. It allows you to see how your app will look and function in real time. It’s an essential part of the development process, enabling you to test and refine your app before publishing it. In the App preview, you can switch between desktop and mobile views to ensure your app looks great and works well on all devices, navigate through your app as if you were a user, click through screens, interact with components, and check that all functionality behaves as expected.
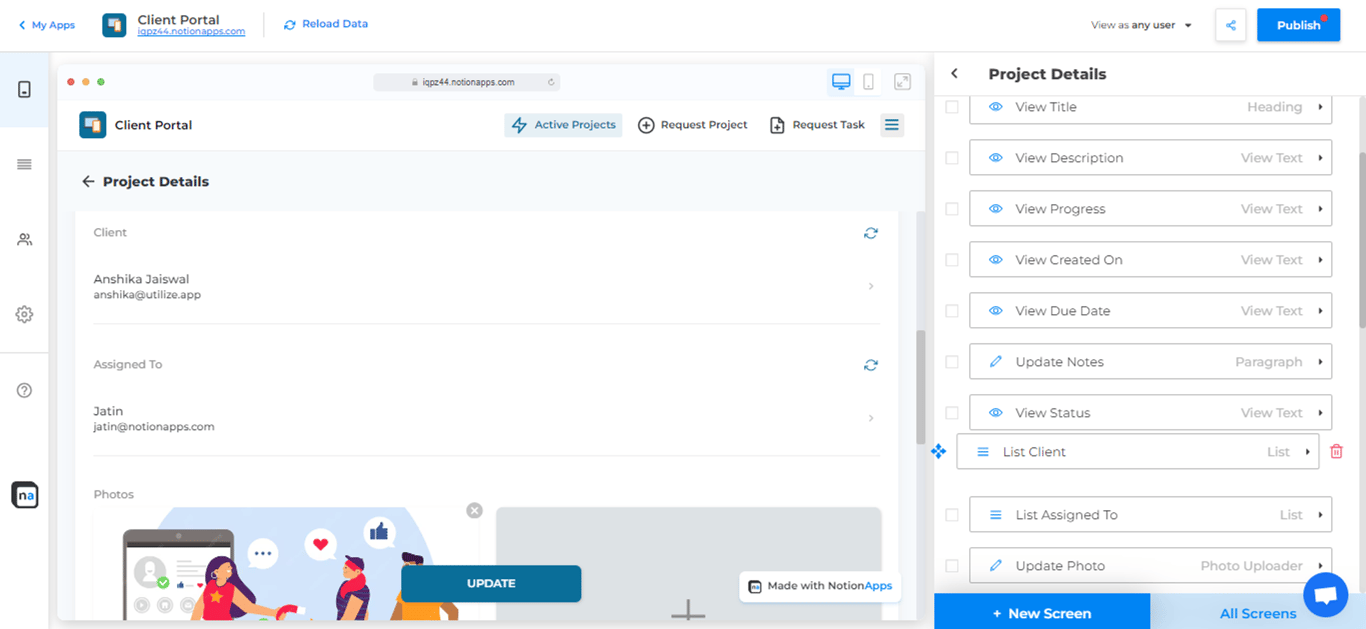
Drag-and-drop interface
The drag-and-drop interface allows you to create and customize your app without writing any code. For example, if you're building a client portal and want the client name to appear at the top of the Projects update screen instead of the project name, you can simply drag and drop the client list component to the top in the app builder.
Additionally, you can either show screens in the sidebar menu of the app or in the top tab of the app, Simply dragging and dropping screens to adjust their positions.
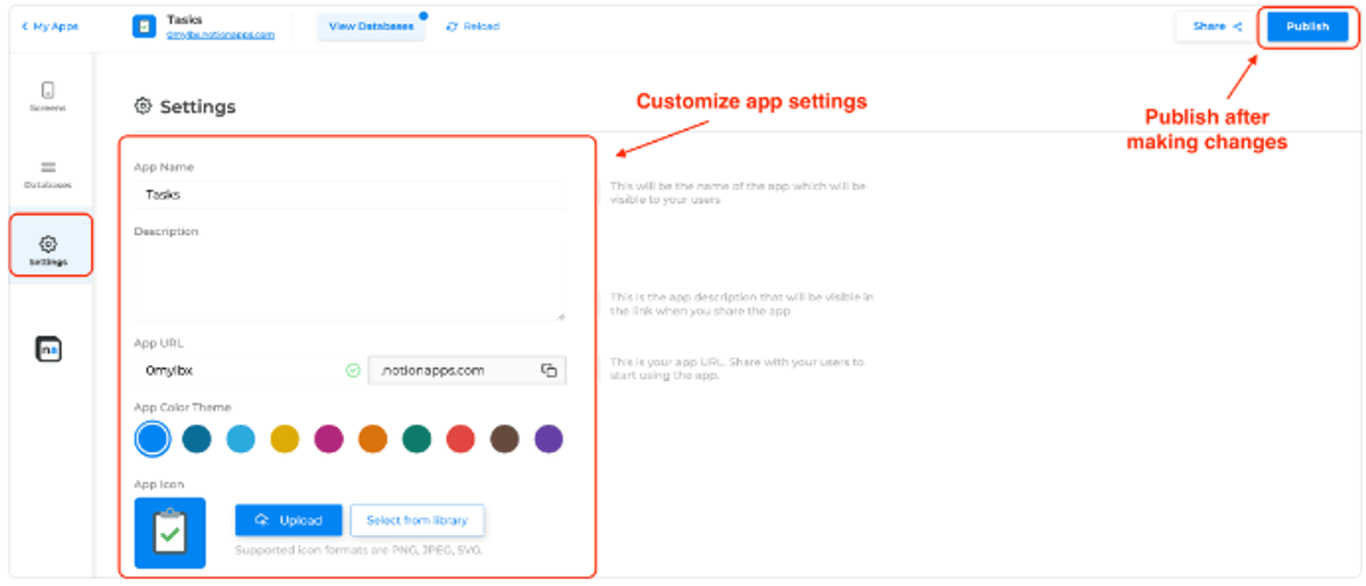
App Settings
You can customize your app's icon, color, and URL to create a unique look and feel for your app. You can also customize the app's name and description.
To customize your app, open it in the app builder and click on the "Settings" button in the left side panel. For the app icon, scroll to the "App Icon" section and either select an icon from the library or upload a custom one. To change the app color, go to the "App Color Theme" section and choose from the pre-defined themes. For the app's URL, scroll to the "URL" section, ensuring it only contains letters, numbers, and hyphens. If your desired URL is taken, select a different one and publish the app to make it available at the new URL.
💡
You can link your own custom domain to the apps and buy additional domains.
This means the app will be available on app.mydomain.com instead of app.notionapps.com, making it easier to promote the app with your branding when sharing it with others. We have detailed documentation on how you can set up your custom domain, refer here.
Screens
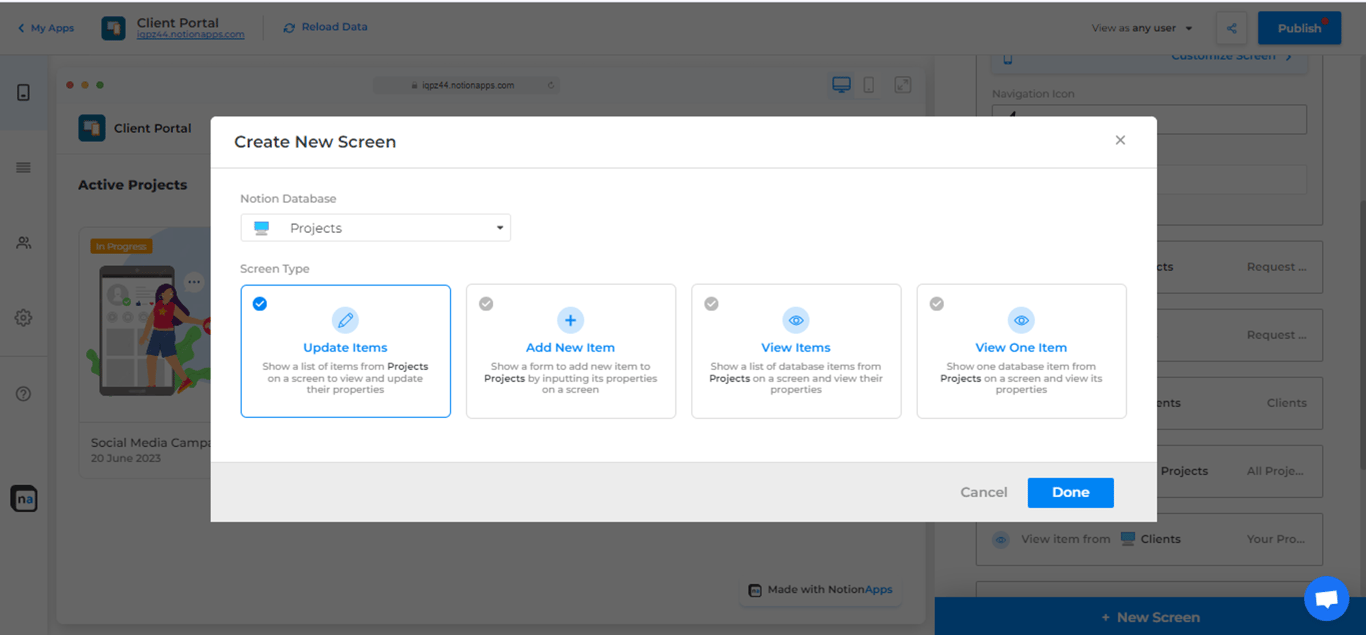
Screens are customizable interfaces that serve specific functions, such as listing database items, viewing or updating individual item details, and adding new entries. When building an app, you can create four types of screens. Each screen type serves a distinct purpose and can be tailored to suit your app's specific needs.
View Items: This screen lists all database items, allowing you to apply filtering and sorting. For example, your clients can use this screen to view all invoices.
View Single Item: This screen displays the properties of a single database item. For example, use it to view detailed information about one specific project from the ‘Projects’ database.
Update Items: This screen allows you to update or view the properties of a single database item. For example, use it to list items from databases like Projects, Tasks, or Resources, and update them as needed.
Add New Item: This screen lets you add a new item to the database. For example, clients can use it to request a new task or project.
Each screen type has a specific purpose and can be customized to meet the needs of your app.
💡
A screen can have customizations based on its type.
Add new screen
Adding a new screen to your NotionApp is a simple process that allows you to customize the look, and functionality of your app and how your users view rows in databases Follow these steps to add a new screen to your app:
Open your app in the app builder.
Click on the "+ New Screen" button in the bottom-right corner of the app builder. This will open a popup that allows you to add a new screen to your app.
Select the Notion database whose items you want to view, update, or add from the drop-down menu.
Select the type of screen you want to add and press “Done”.
After adding the screen, you can customize its appearance and functionality. You can customize the look of the screen by changing its row configuration, title, and icon. You can also filter and sort the screen items to display the data in the way that makes the most sense for your app. You can delete or duplicate a screen using the buttons provided right next to the screen name. Consult this document for detailed reference.
Navigating between screens
When designing your app's navigation, it's important to consider the different experiences users will have on desktop and mobile devices. Here's how you can set up and customize navigation for both platforms.
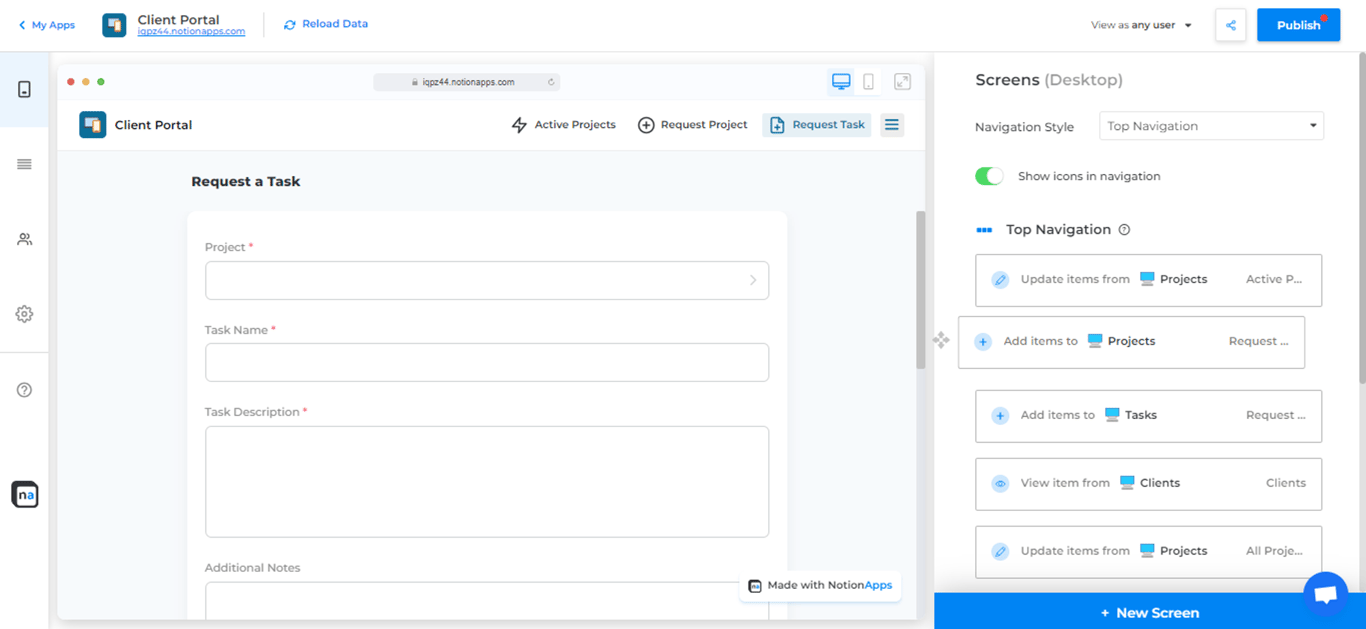
Desktop Navigation
For desktop users, you can choose either a top navigation bar or a side navigation panel. This setup allows for a more expansive view and easier access to features due to the larger screen size.
Here's how to configure the navigation in your app after opening it in App Builder:
Click on the "All Screens" button in the bottom-right corner of the app builder to view all your screens.
Decide whether you want to use top navigation or side navigation. You can only choose one.
Choose the navigation from the dropdown to edit screen positions. Drag and drop screens as per your liking.
You can change the name and icon of the screen to better represent its function. Choose whether to show icons for each item.
Once you're done, you can return to editing the screen by clicking on the "Customize Screen" button.
Mobile Navigation
For mobile devices, the navigation setup is more compact to accommodate the smaller screen size. The steps for configuring navigation on mobile are the same as for desktop, but with additional flexibility in using both bottom navigation and side navigation. By default, newly created screens are added to the bottom tab, but you can move screens between the bottom tab and the side drawer as needed.
Bottom navigation tabs are ideal for primary features that users need to access frequently and quickly. This includes essential functions like tasks, projects, resources, and invoices.
The side navigation drawer is perfect for secondary features or less frequently accessed screens. Examples include sections like "About Us" and "Testimonials.”
To move a screen between the bottom tab and the drawer, click on the screen and drag it to the desired location.
Screen visibility
In some applications, you may want to show or hide screens based on who is logged in. This is where Screen Visibility Logic comes in. For example, in a Client Portal, you might want to show the Invoice screen only to the finance manager in the client's team and hide it from other users.
To use screen visibility, follow these steps:
Ensure your app is private by selecting a users database. Learn how to do this here.
Go to the screen you want to hide.
Find the section named "Screen Visibility Logic."
Click on the "+ Add Logic" button.
Select the "Role" column (or a relevant column for your app) from your Users' database.
Add a condition where the Role column's data is equal to "Finance Manager."
With this setup, only users with the Role property set to "Finance Manager" will see the Invoice screen when they log in.
To test screen visibility in the app builder:
Click the "View as" button in the top bar.
Select a user to view the app as that specific user. "Any user" means no user has been selected.
If a screen is hidden for the currently selected user, you will see a message on top of the screen indicating it.
Components
Components let you customize the appearance and functionality of a screen, serving as interactive elements that users can engage with. They effectively capture user inputs and present data in a visually appealing way, ensuring your app meets users' specific needs.
Various types of components can be added to the screen, allowing you to choose based on your requirements. For example, you can add a dropdown component to update the status of projects or tasks.
Update/Add Components: Text Input, Paragraph Input, Number Input, Date Input, Checkbox, Photo Uploader, Video Uploader, File Uploader, Dropdown, Multi-select, Detect Current Location, Address Finder.
How to Add a New Component
Adding a new component to a screen is a straightforward process that involves a few key steps:
Go to any screen, such as Update Item, by clicking on a row in a List screen OR by clicking the "Go To Screen" button in the screen configuration section.
Once you're on the secondary screen, click on the plus (+) button in the screen configuration section.
In the panel that opens up, you can select a logic based on the field you want to show and a default component will be added to the screen (which you can customize later). Alternatively, you can select a specific component from the "Components" section and change its field to the desired field.
After adding the component, you can customize its appearance and functionality. Adjust its layout, styling, and behavior to match your app’s design and user experience goals. We will learn more about how to do this in the ‘Forms’ section.
⚙
There are 25+ components on NotionApps for you to choose from.
Component Visibility
In some forms, you may want to display an input or view component based on the data entered in another input. To do this in Utilize, expand the configuration of the input or logic whose visibility you want to change. Enable the "Visibility Logic" toggle, then select the property and the condition that will determine when to show the component.
❗
On the View Single Item/Update Items screens, you can also show/hide logic based on the current item's data.
Step 4. Customize App: Lists
In NotionApps, you can seamlessly integrate and display data from Notion databases as dynamic lists within your app with row-level access. Utilizing the app builder, you can customize these lists with various features to enhance data visibility and accessibility.
Lists
Lists in your app, present your database items in a structured and accessible format. By utilizing list screens like "View Items" and "Update Items," you can effectively access and manipulate database content directly within your app. Whether you need to display a list of tasks, projects, or client team members, the builder allows you to customize the presentation and functionality of your lists. To configure a list, follow these steps:
Open the app builder and click on the "+ New Screen" button.
Select the desired Notion database from the dropdown menu.
Choose between the "View Item" or "Update Item" screen types.
Confirm your selection by clicking "Done" to add the screen to your app.
Views
Choose from multiple view types, like list view or grid view, and configure what database properties you want to show in the view like title, description, image, caption, and color tag. Select the view that best suits your team's needs for clear data visibility.
Filtering & Sorting
In-App Filtering:
In-app filtering enables users to refine data within the app based on specific criteria. For example, when the “Status” column is selected as a filter column, “Pending” and “Delivered” will be shown as filters if they are the unique values in the column.
💡
You can also add multiple filter columns if you want to combine the results of different filters.
Sorting:
Sorting helps users arrange items in a specific order. You can sort by various properties, such as "Due Date" or "Priority" You can add a sorting logic to your screen by going to the desired screen and clicking "+ Add Sorting".
Filtering:
Filtering allows users to narrow down a list of items based on specific criteria. For example, “Task Status” is equal to “Done” and the “Due Date” is “Today.” You can add a default filtering logic to your screens by going to the desired screen and clicking "+ Add Filtering".
Searching:
The search bar functionality at the top of the screen ensures your team can find the information they need quickly.
Step 5. Customize App: Forms
NotionApps allows you to build form-based apps to add and update data on your Notion databases without coding, ensuring that your database remains accurate and up-to-date.
Forms
Forms are used in screens like "Update Items" and "Add New Item" to facilitate data entry and modifications directly from the app. These form screens can be configured in the builder to meet your app’s specific requirements. You can drag and drop customizable components for both gathering and displaying data within these forms. For instance, if you want to add a new task request, you can create an “Add New Item” screen.
Here’s how to configure and customize forms:
Create a Form Screen: The process is the same as adding a new screen. Select either the "Update Item" or "Add New Item" screen based on your needs.
Use the Drag-and-Drop Builder: Add input and view components to your form screen.
Customize Components: Adjust each component to match the specific data fields and requirements of your app. For example, on a "Request a Task" add new item screen, you can add:
Text Component: For entering the task name and client name.
Date Picker: For selecting the assigned date.
File Uploader: For attaching notes or relevant files.
Update Items / Update Form
The "Update Items" screen type allows you to create screens that enable users to update items or pages directly within your app. This feature provides a seamless way to modify data stored in your Notion databases. To create an "Update Items" screen, click the "+ New Screen" button, select the Notion database to update, and choose the "Update Items" screen type. Use the "Go to Screen" button or click a row in the app preview to access the "Update Single Item" screen, then configure it with "View" and "Update" components to display and modify item properties.
Update Components: These components capture new data or update existing data. For example, you can add or update properties like "Completion date," "Invoice," or "Status" using components like date picker, file uploader, and dropdown respectively to modify corresponding property values. With a few clicks, your team can update these details, including adding attachments like images or documents, as needed, ensuring data stays current and captures the full picture. For instance, here we added a checkbox to update about the urgency of task.
View Components: These components allow you to control what database properties are visible on the screen, ensuring your team sees only the most relevant information for their tasks. You can choose to display properties like "Name," "Task Date", "Description", "Progress%", and more. You can also add components like a Contact Card or Link. Additional options include setting properties as "required," defining visibility logic, and adjusting the component type to best represent the property.
Add New Item / Add Form
The "Add New Item" screen type allows users to add items or pages directly to your Notion databases. This is useful for adding new entries, such as creating a new project request form. When the user fills in the necessary information and clicks "Save," a new page will be created in the selected Notion database, capturing the submitted data. The new pages reflect on Notion immediately. You can create an "Add New Item" screen in one of two ways:
Either by adding a new screen of type "Add New Item"
Or enabling the "Allow Adding" option on a "View Items" or "Update Items" screen.
Update Components: Similar to update forms, add forms can include a variety of update components to capture new data. For example, in a Client Portal, you might use text inputs for "Client Name," date pickers for "Completion Date," and file uploaders for "Invoice."
In addition to adding data, NotionApps allows you to delete obsolete or incorrect records with ease. You can configure delete actions within your app's layout, such as a "Delete" button. Once triggered, the selected record is permanently removed from your Notion database.
✅
Once submitted within the app, form data automatically populates your Notion database.
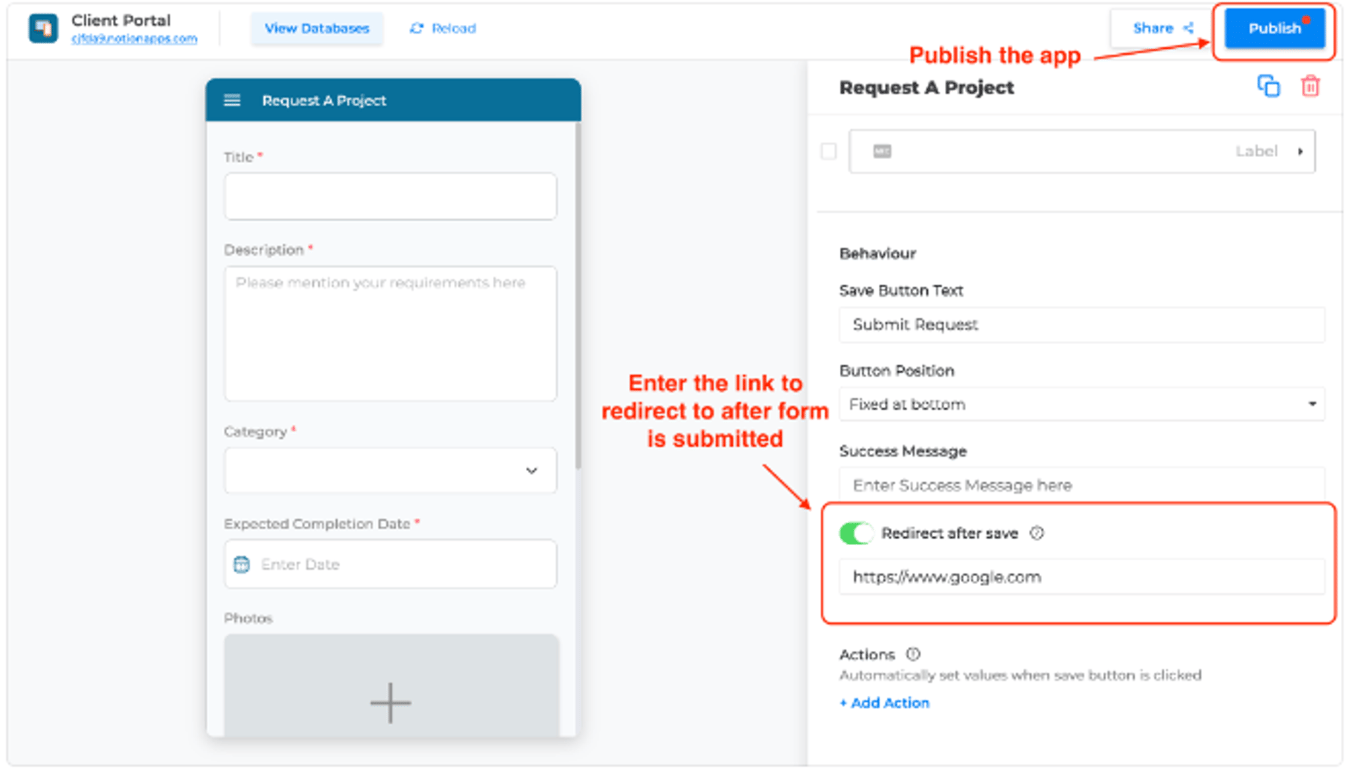
Form submit redirection
When a user submits the form on an Add New Item or an Update One Item screen, you can redirect them to an external link. This feature allows for a smoother user experience, directing users exactly where they need to go after they've completed a form. For example, you can redirect your client to a confirmation page after they have submitted a project request.
This is how you can enable redirection in your apps:
Open the app builder
Navigate to either the Add New Item or Update One Item screen.
Switch on the toggle to enable Redirect after save
Enter the redirection link and publish the app
Whether it's a thank-you page, a confirmation of submission, or back to the dashboard, tailoring the user's journey has never been easier.
Actions
Screen Actions allow you to streamline your workflow by automatically assigning default values to Notion properties when a user creates or updates an item in your app.For example, if a user forgets to mention Task Status it will be automatically set to "Not Started”.
Relations
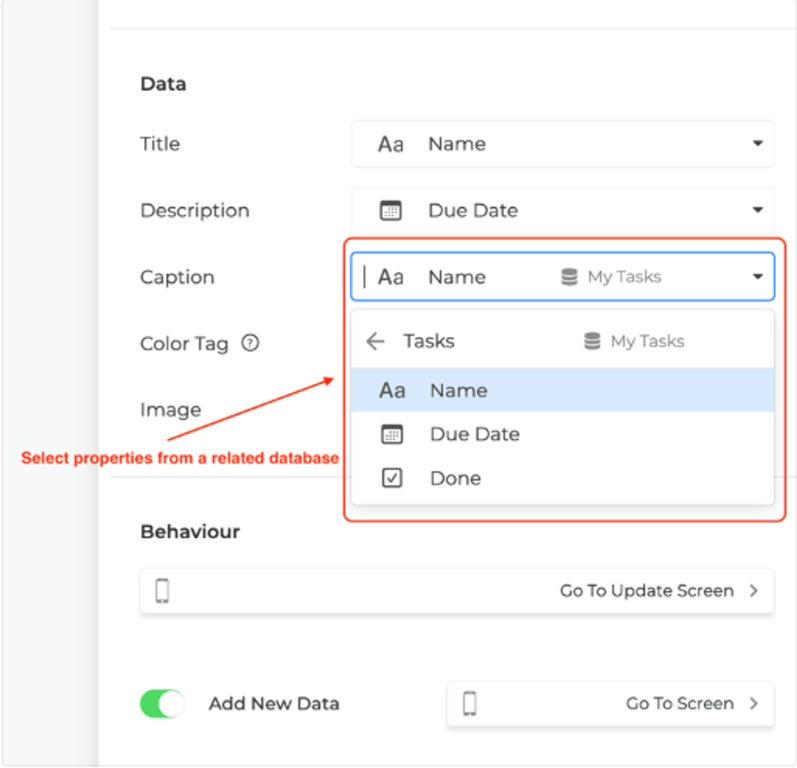
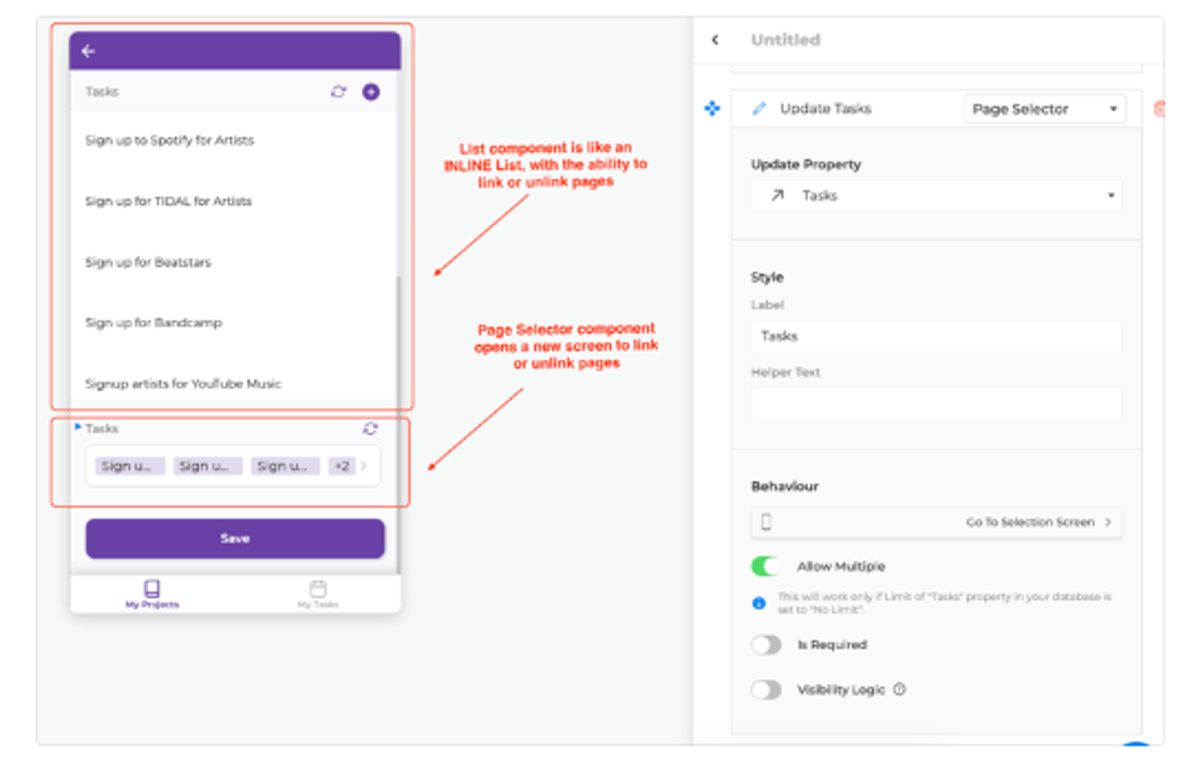
Relation properties can be used by either showing the related page properties in your screen configuration or using the List or Page Selector components.
Showing related page data - Properties from related databases could be used in multiple app configuration to show data from the related pages.
List component - A List component can display an inline LIST of related page items on your form or details screens.
Page selector component - A Page Selector component can open a new screen to link or unlink existing pages from the related database.
Step 5: Users & Data Restriction
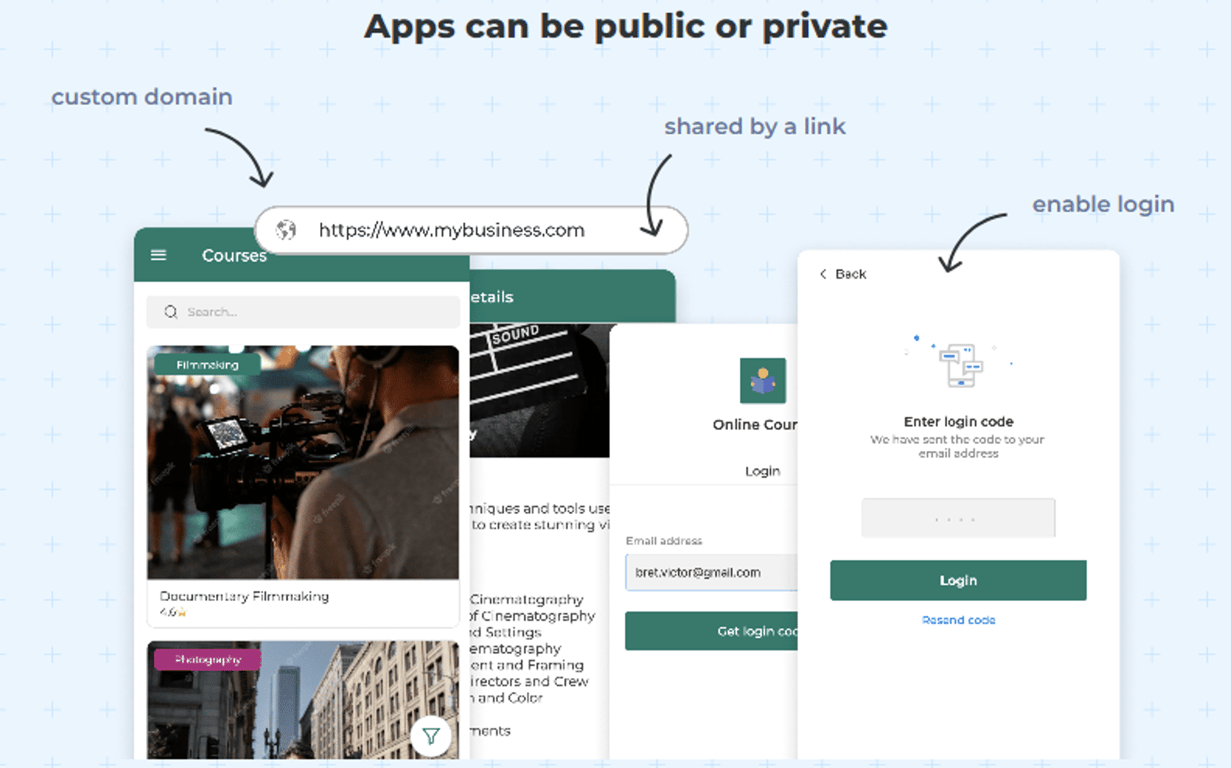
While NotionApps makes data sharing and collaboration easy, it's crucial to keep certain information private and secure, especially when building client portals. Private apps allow you to control who can access the app and what data they can see. Enabling the login feature is essential for this purpose, ensuring that only authorized users can enter the app. This is particularly important for client portals, where sensitive information needs to be accessible only to specific clients based on their roles.
For example, in a client portal, User A would see only the items they are assigned to and not anyone else's items. This level of data restriction ensures that each client's information remains confidential and only accessible to the appropriate individuals.
Introduction to Users
The Users tab serves as the hub for managing access to your app. By default, apps are public, meaning they are accessible to anyone with the link.
To restrict access, you must enable login, which involves setting up a User database. This database stores user details such as email addresses and usernames, enabling you to control who can log in and what data they can access.
For instance, in a 'Clients' database, users who can access an app built with NotionApps are stored. You have the flexibility to add, modify, and remove users within this database. Access to the app is granted only to users whose email addresses are registered in this database. It's crucial to understand that deleting this database or the "Email" property will automatically switch your app to public access.
For detailed info on how to create a Users database, refer to this documentation.
Enable Login
To switch your app from public to private:
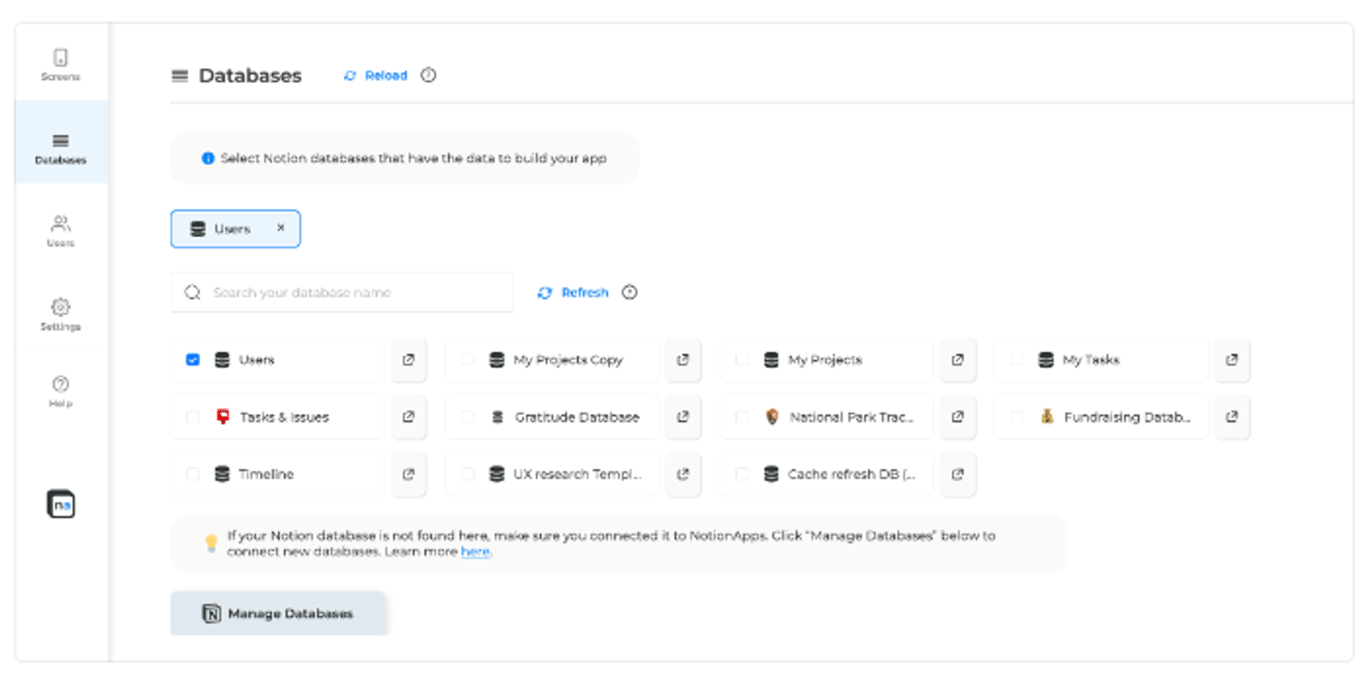
Open the app builder and navigate to the "Users" tab on the left-hand side.
Choose a Notion database containing user data, such as clients. If you don't have a users database, duplicate the sample database provided by NotionApps.
After creating the Users database, link it to your application in the app builder. This step ensures that the app can use the user data for authentication. Once linked, you should see the Users database listed under the ‘Users’ section.
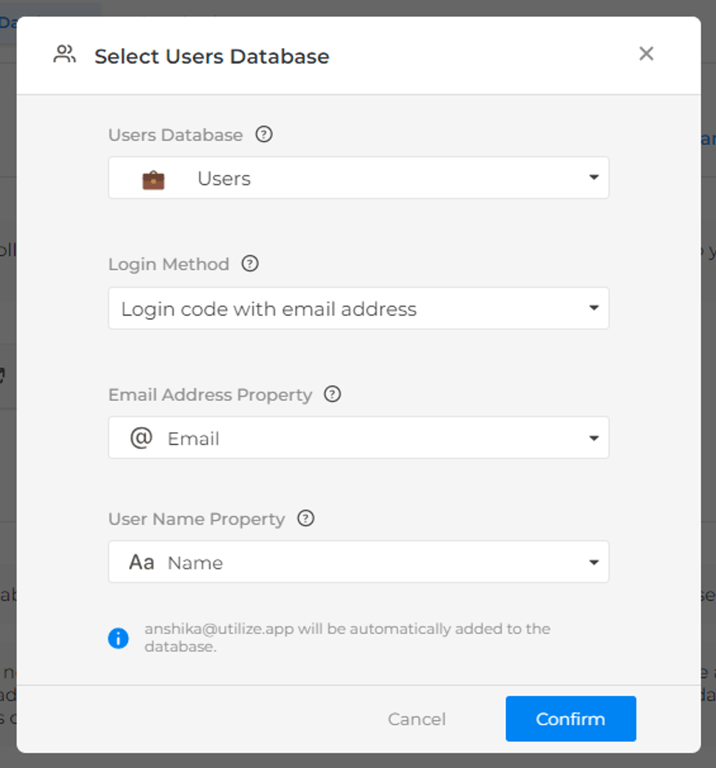
Specify the email in the ‘Email Address’ property and name in the ‘User Name’ property while configuring the Users database. NotionApps will use these columns for user authentication.
Publish the App: Your app is now a private application. Publish the app to apply the changes. When users open the app, they will need to log in to access the data. After publishing, open the app in a new tab. You’ll be prompted to log in with the email address. A login code will be sent to the user’s email. Enter the code to access the app.
Data Restriction
You can manage row-level database restrictions to ensure users only see data assigned to them. This feature is essential for client portals, where each client should access only their specific data.
To restrict data for users, follow these steps:
Set Up Data Restriction:
Select a data restriction property from your database that relates to the users' database or contains the email addresses of the users who can access the data.
To assign multiple users to data, link them to the user relation property or store them as comma-separated values.
Configure Restrictions:
Go to the "Users" tab in the left sidebar of your app builder.
Under the "Data Restriction" section, click on "Add Restriction" next to the database you want to limit.
In the "Add Restriction" popup, choose the "Restriction Method"—either "Select Relation to Users Database" (a relation linked to your Users' database) or "Select Property with Email Address."
Select the property that will match with the logged-in user.
Publish the App:
After confirming the settings, publish the app.
Once these steps are completed, users will only see the database pages/items where their email ID is present or their data is linked in the user relation property. This ensures that each user has access only to their assigned information, maintaining privacy and security within your client portal.
❗
It's preferred to filter data using the "Select Relation to Users Database" restriction method.
Step 6: Publish Your App and Share Securely
After customizing your client portal, it's time to share it with your clients!
Publishing Options:
Shared by Link: Generate a shareable link that allows anyone with the link to access the app, suitable for public apps or temporary access needs.
Custom Domain (Optional): Enhance your app's professionalism by assigning a custom domain name (e.g., "yourcompany.notion.app").
Conclusion
Creating a customized client portal gives your clients that extra bit of value. NotionApps features an intuitive drag-and-drop builder, customizable components and screens, enables you to build a portal for your clients without coding, straight from your Notion databases. Tailor your portal to fit your operations, giving clients easy access to information, and eliminating the need for endless email chains.
With NotionApps, you can create apps with shared views of projects, including timelines and tasks, allowing both employees and clients to view, create or update tasks. Additionally, you can build a resource hub with articles, how-to videos, and FAQs, empowering clients to self-serve whenever they need it. Customize and control what information different types of users can access and which actions they can take.
These apps provide the ability to access and update data on any platform—web, Android, or iOS—to ensure your clients remain informed and engaged.
Build your first app now!
✅
Follow us on Linkedin and X for more tips and tricks on using NotionApps to optimize your client experience.
Notion Sites allow you to turn your Notion pages into a fully functional website with ease. Whether you’re a beginner or an advanced Notion user, this guide will help you build a sleek, professional-looking site using Notion in just a few minutes.
This ultimate guide explains how to embed Google Calendar in Notion using various methods. Improve your organizational skills and manage your tasks seamlessly within Notion.