Transform Your Notion Database into a Mobile App for Your Teams
Transform your Notion databases into a user-friendly mobile app with NotionApps, simplifying operations for field and deskless teams. Say goodbye to complex page-based experiences and hello to intuitive drag-and-drop features, real-time data syncing, and seamless access across web, Android, and iOS platforms. Keep your field teams organized and productive with a customized app that effortlessly manages tasks, tracks inventory, coordinates projects, and provides a centralized view of business activities, sales, and other field data. Boost efficiency and collaboration with NotionApps' flexible and accessible solutions.
Do you rely on Notion databases to manage your operations, but your team isn’t happy with the complex page-based Notion experience? You’re not alone. The more complex your operations, the tougher it is for your teams to use Notion. The experience gets even more cumbersome when used on smaller screens and mobile phones.
Internal apps should be straightforward to keep everything organized and accessible for your team. While Notion is powerful, its complexity can sometimes be a drawback. Simplifying this experience with a dedicated mobile app can help your team stay organized and efficient, making it easier to manage your operations - be it updating tasks, tracking inventory, or coordinating projects on the go.
This guide will show you how to seamlessly convert your existing Notion databases into a simple-to-use mobile app. You can link all your Notion databases and create a mobile-friendly app that acts like a centralized hub, boosting your team's efficiency and productivity. This is helpful especially if your teams work on the field and do deskless operations.
Step 0. Setting up a free NotionApps account:
To build apps from Notion, we will use NotionApps (a third-party tool to build apps from Notion without coding). Follow these steps to set up an account and connect your Notion workspace:
If you don't have a NotionApps account yet, sign up.
Once signed up, you'll land on the home page. If not redirected, click here.
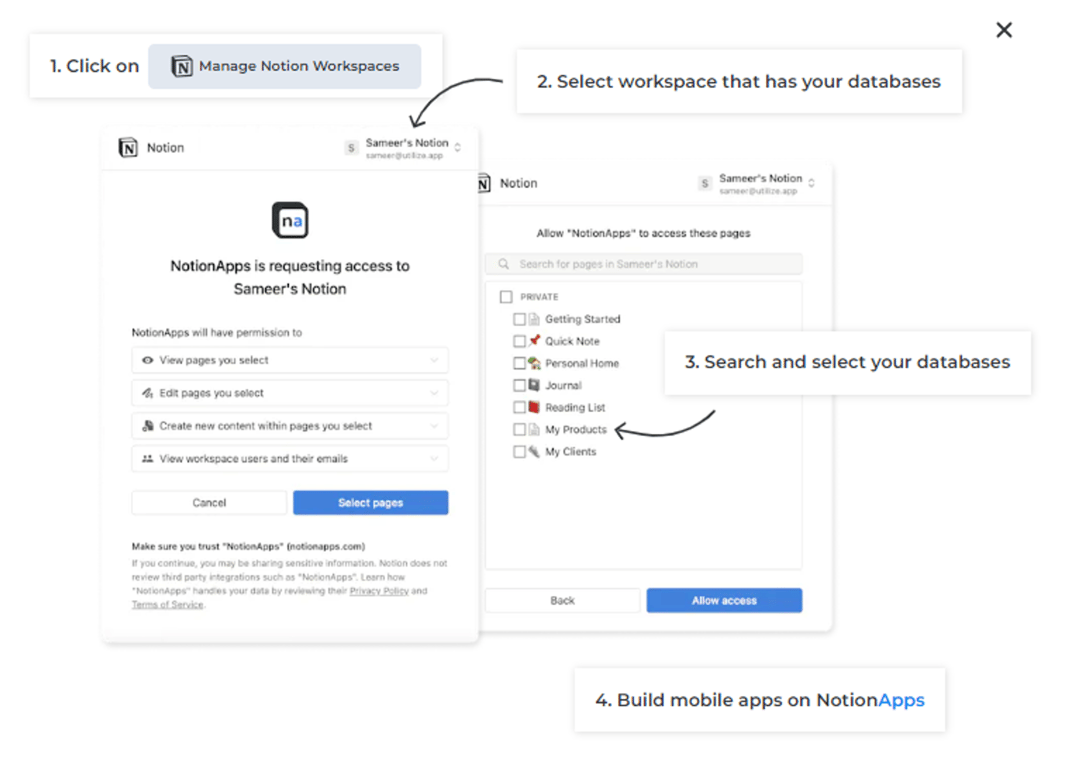
On the NotionApps home page, find and click the "Connect Notion" button. This action will take you to the Notion Authorization page.
Choose the workspace and top-level pages on the Notion Authorization page that include the databases you intend to utilize for creating apps.
Grant NotionApps access to your Notion account by clicking the "Allow Access" button.
Step 1. Creating Your Mobile App:
NotionApps offers two methods for creating your app:
Link Your Existing Database: Start by clicking the "Create New App" button on the NotionApps homepage. This action will navigate you to the "Create New App" page. For detailed instructions, please refer to the ‘Create New App’ documentation.
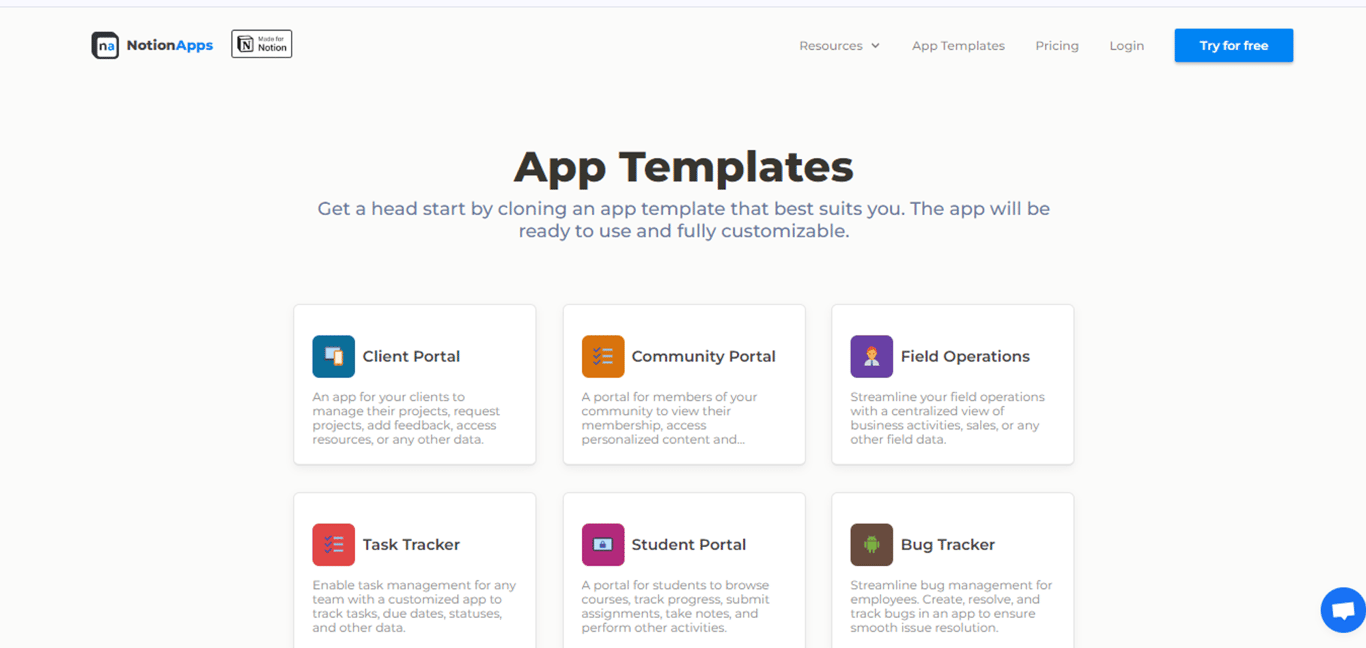
Clone an App Template:
Go to App Templates, where you will find a list of pre-built apps that can be cloned into your account. Note that once cloned, you can further customize the app to your requirements. For example, you can clone our “Field Operations” app template if your use case is to build an app for your field teams.
Before you clone the app, you will be prompted you duplicate the Notion template with sample data for the app.
Connect the duplicated Notion template to the app, by clicking “Connect Notion Template” and then allowing access to the duplicated database.
Once you've selected the Notion template, click "Clone App" to complete the process.
Tada! The app is now yours to customize.
Step 2: Ready your Notion data
Remember, your Notion databases are the data source for your app. This means you can continue using them like you normally do. Before further customizing the app, make sure that your data is ready on Notion.
If you created the app by cloning the App Template, you can modify the sample databases of the Notion template to suit your needs.
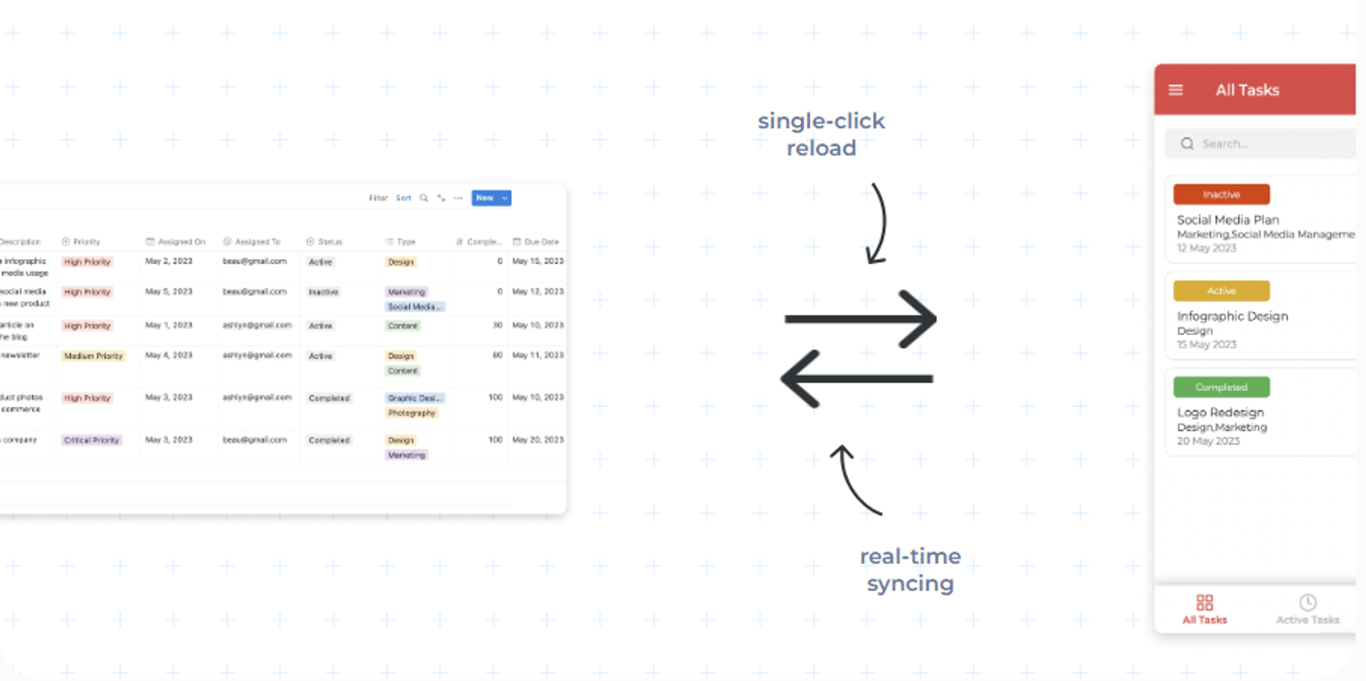
However, to view these changes in NotionApps, you need to reload the data. This is a straightforward process.
To retrieve the latest data from Notion, click on the "Reload" button in the app builder's top bar. This action prompts the app to fetch the most recent data from your Notion database.
💡
Note that, the data modified on the app is synced in real time into your Notion databases. The “Reload data” feature is to sync the changes you do on Notion into your apps.
Step 3. Customize App: The Basics
Now that we've created the first version of your app, it's time to explore how to customize the app's functionality to suit your needs. In this step, we will talk about personalizing how your data is viewed and interacted with in the app. Further in the tutorial, we also discuss how to update and add data into Notion from your apps.
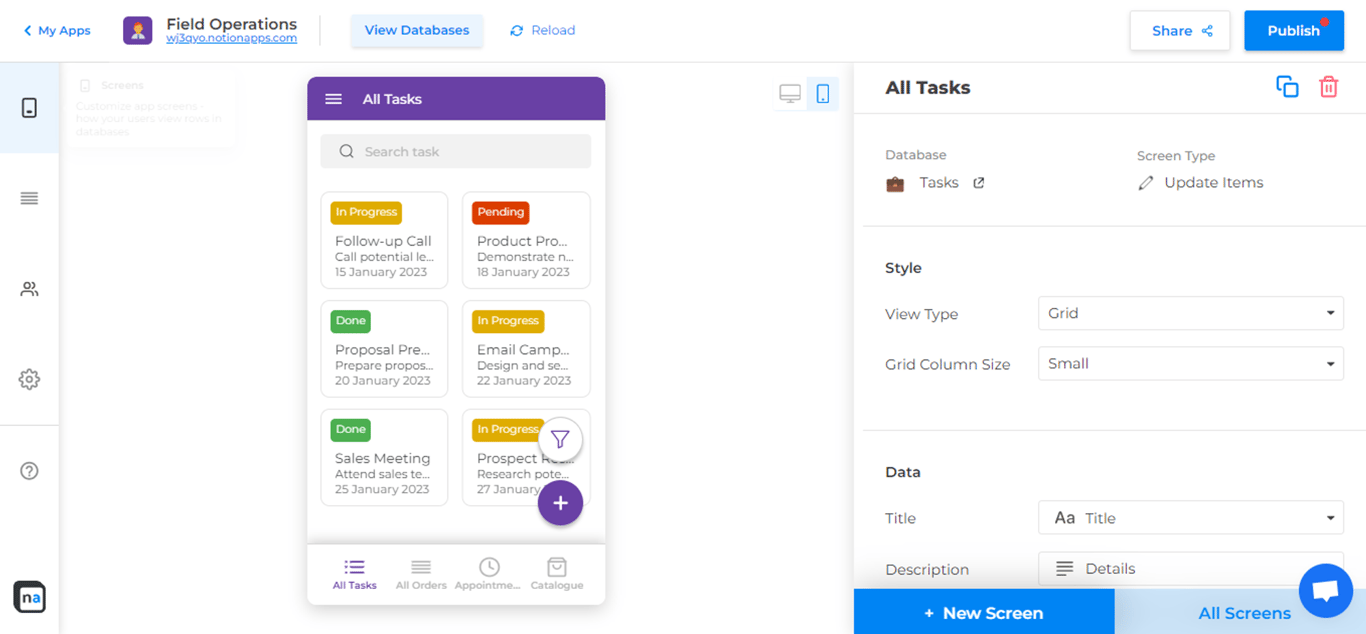
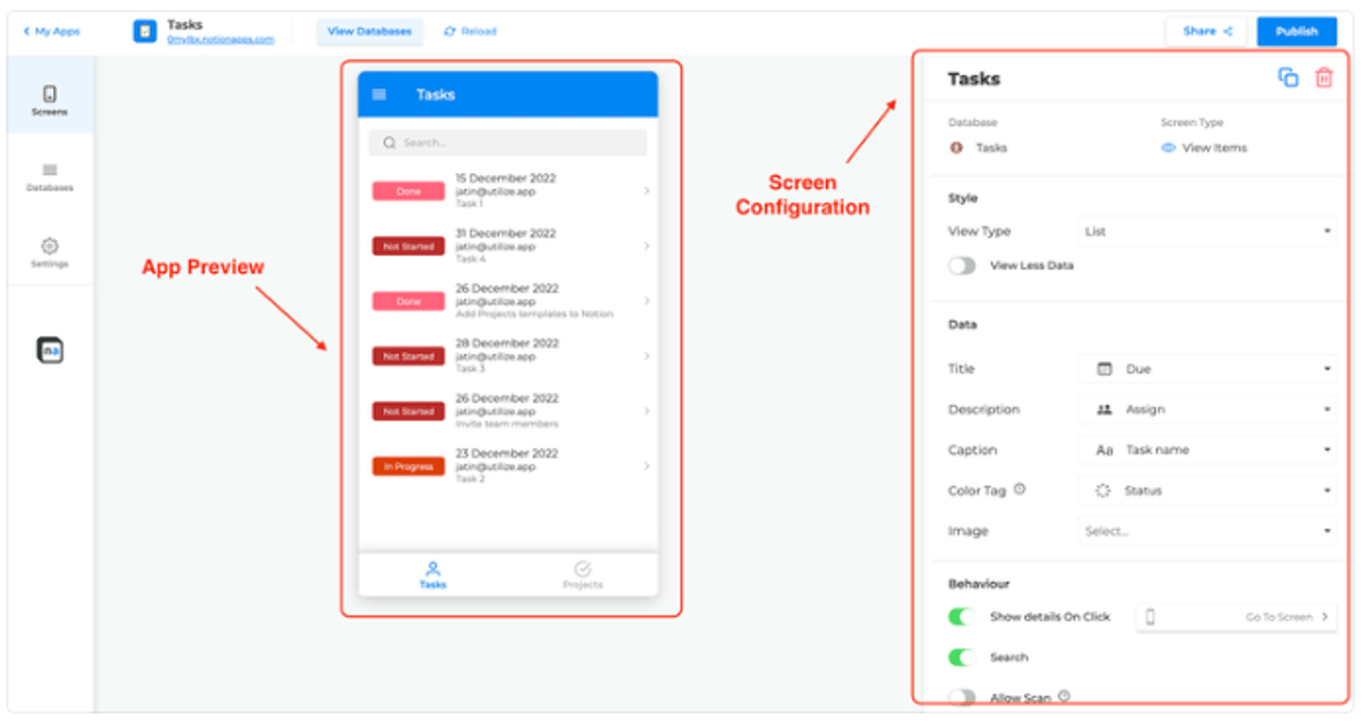
App builder
The App Builder in NotionApps is the primary workspace where you can customize and design your app to meet specific needs and preferences. To start customizing, navigate to the home page and click on the app you wish to modify. This will open your app in the App Builder interface, providing you with a range of tools and options to create a user-friendly and intuitive app. Within the App Builder, you can add and customize screens, add different components, set component and screen visibility, configure app navigation, and so much more.
App preview
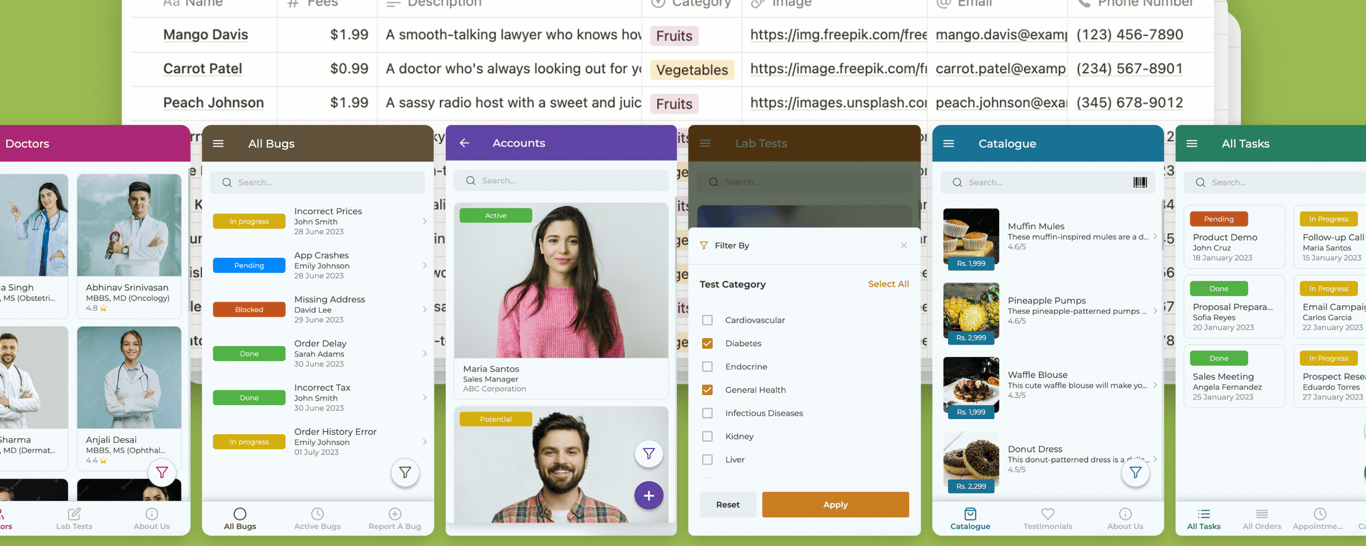
The App Preview is the preview area in the center of the app builder. It allows you to see how your app will look and function in real time. It’s an essential part of the building process, enabling you to test and refine your app before publishing it. In the App preview, you can switch between desktop and mobile views to ensure your app looks great and works well on all devices, navigate through your app as if you were a user, click through screens, interact with components, and check that all functionality behaves as expected.
(This is how the App Builder and App Preview looks)
Drag-and-drop builder
The drag-and-drop builder in NotionApps allows you to create and customize your app without writing any code. You can easily change the positioning of components by dragging and dropping them into place, optimizing the layout for a better user experience.
Additionally, it allows you to switch navigation styles between bottom tabs and side drawer by simply dragging and dropping screens. This intuitive tool enables you to build functional, user-friendly apps quickly and efficiently.
Screens
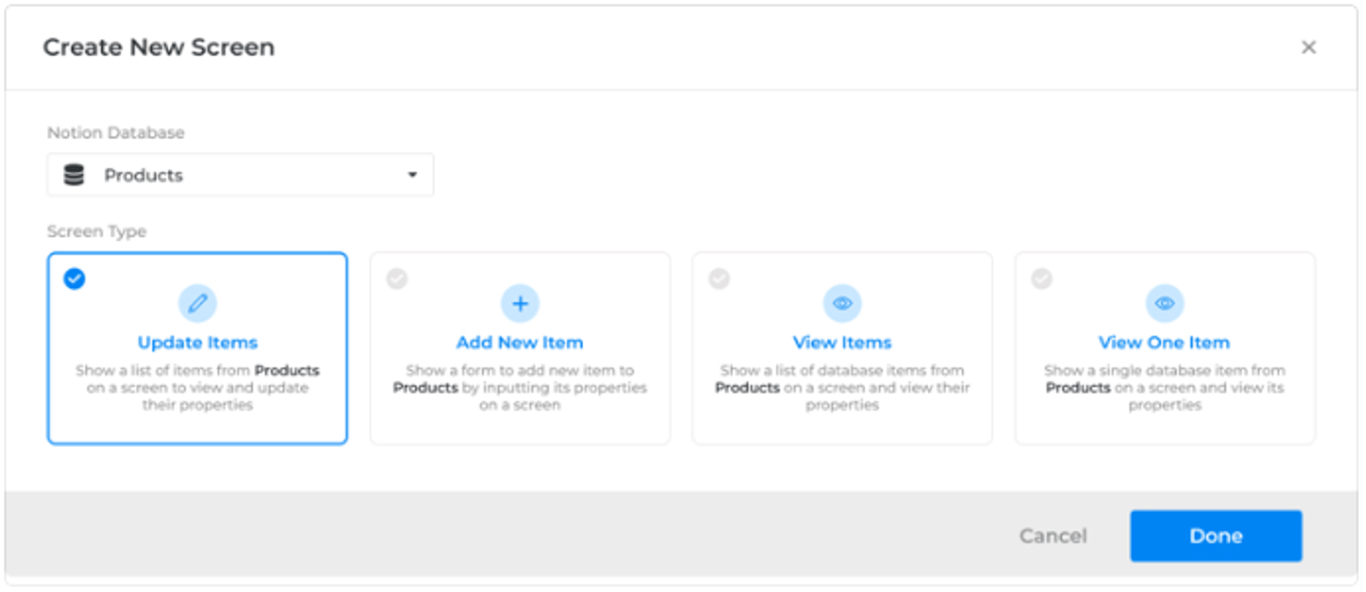
Screens in NotionApps are customizable interfaces that serve specific functions, such as listing database items, viewing or updating individual item details, and adding new items. When building an app, you can create four types of screens. Each screen type serves a distinct purpose and can be tailored to suit your app's specific needs.
View Items - Show a list of database items on a screen with their properties. Features like Filtering, Sorting, etc are available for this screen type.
View One Item - View the properties of a single database item unlike ‘View Items’ where all the items are shown.
Update Items - Update or view the properties of a single database item
Add New Item - Show a form to add a new item to the database by inputting its properties on a screen.
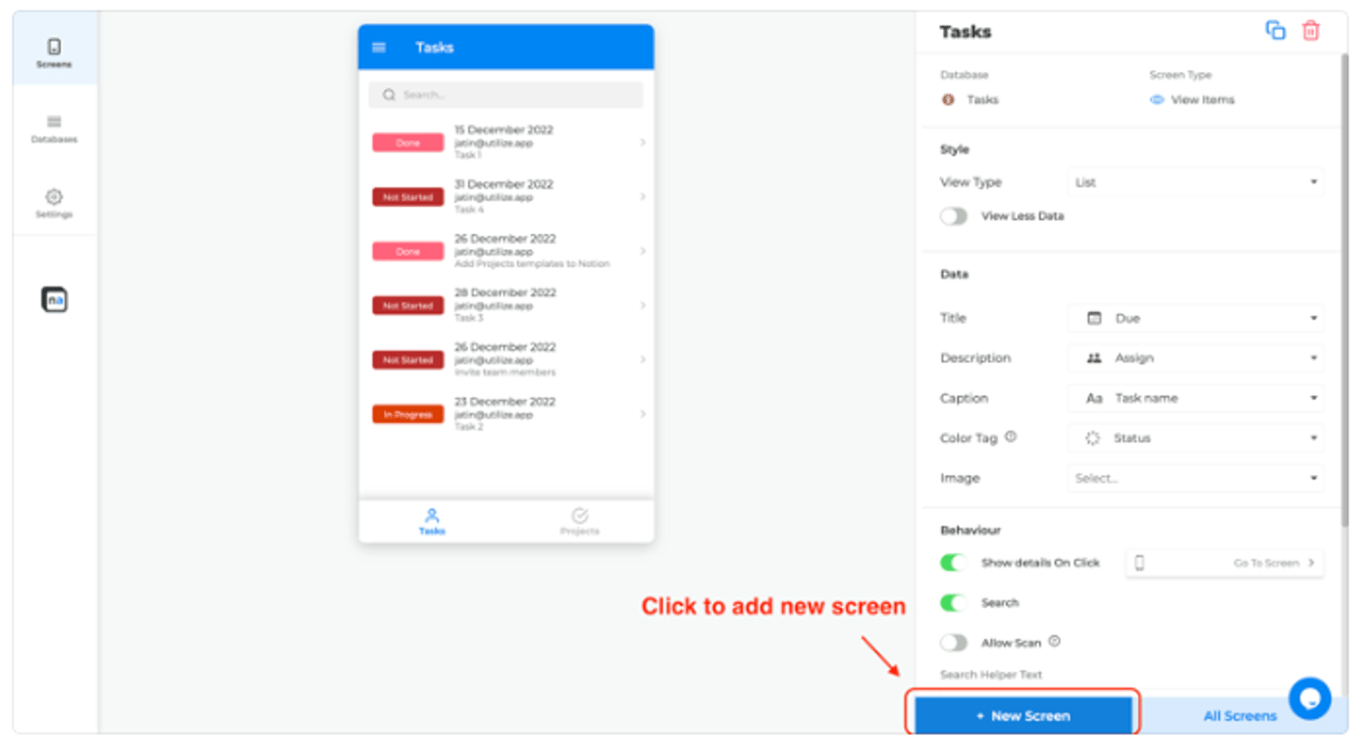
Adding a new screen to your NotionApp is a simple process that allows you to customize the look and functionality of your app. Follow these steps to add a new screen to your app:
Open your app in the app builder.
Click on the "+ New Screen" button in the bottom-right corner of the app builder. This will open a popup that allows you to add a new screen to your app.
Select the Notion database whose items you want to view, update, or add from the drop-down menu.
Select the type of screen you want to add and press “Done”.
After adding the screen, you can customize its appearance and functionality. You can customize the look of the screen by changing its row configuration, title, and icon. You can also filter and sort the screen items to display the data in the way that makes the most sense for your app. Consult this document for detailed reference.
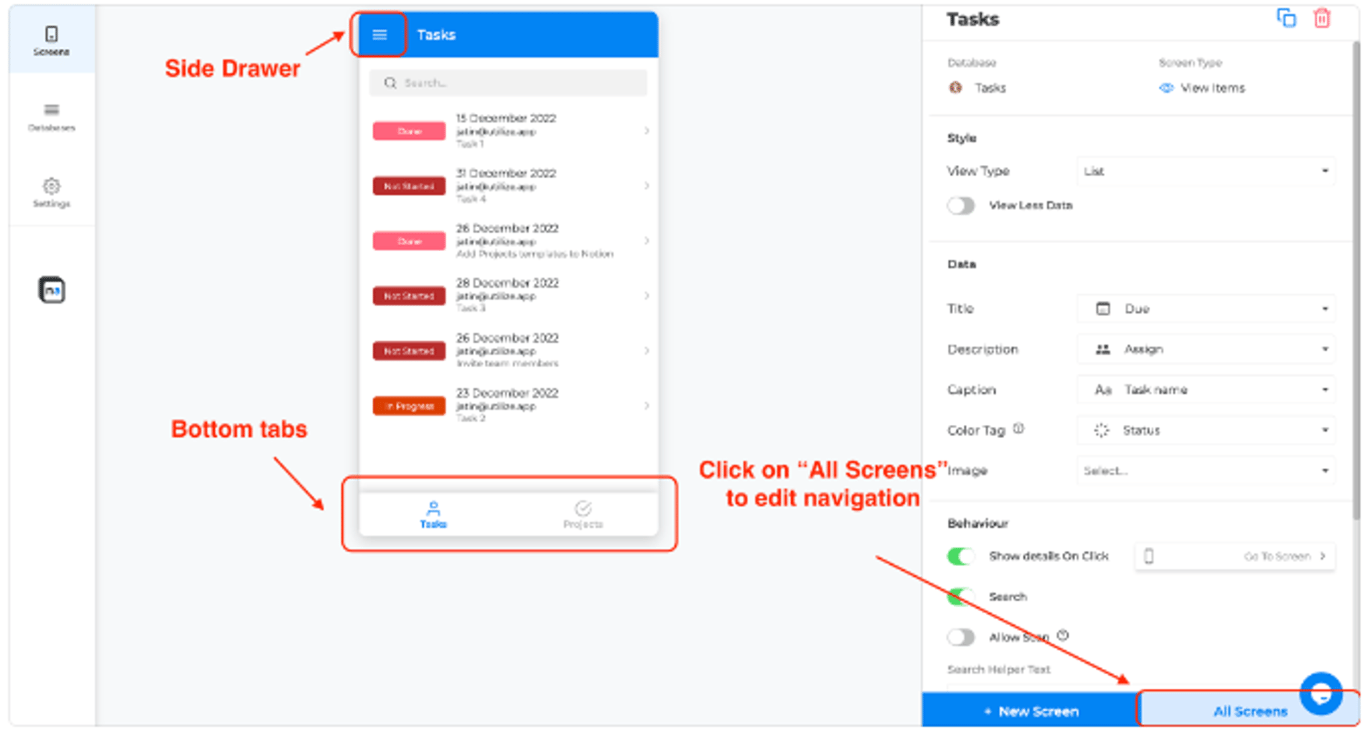
Navigating between screens
NotionApps allows you to configure your app's navigation with two types: bottom tabs and side drawer. The app builder automatically adds a newly created screen to the bottom tab by default, but you can move the screen between the bottom tab and drawer as needed. Here's how to configure the navigation in your app after you’ve opened your app in App Builder:
Click on the "All Screens" button in the bottom-right corner of the app builder to view all of your screens.
To move a screen between the bottom tab and drawer, simply click on the screen and drag it to the desired location.
To change the name or icon of a screen, click on the screen and then edit the desired properties.
Once you're done, you can go back to editing the screen by clicking on the "Customize Screen" button.
Components
Components allow you to customize the appearance and functionality of a screen in NotionApps. They serve as interactive elements that users can engage with, capture user inputs effectively, and present data in a visually appealing manner, ensuring your app meets the specific needs of its users.
View Components:
Heading: Displays titles or headings to organize content.
Text: Shows static text content.
Contact Card: Displays contact information in a structured format.
Video Viewer: Embeds and plays videos.
Photo/Image Viewer: Displays images.
Link: Provides clickable links to external resources or pages.
Checkbox: Shows a checkbox for boolean values.
Location Viewer: Displays geographic coordinates on a map.
Address Viewer: Shows a full address on a map.
File Viewer: Allows users to view files.
Button: Adds interactive buttons for various actions.
View Page Blocks: Displays blocks of content from a page.
Update/Input Components:
Text Input: Captures single-line text inputs.
Paragraph Input: Captures multi-line text inputs.
Number Input: Allows numerical data entry.
Date Input: Provides a date picker for date entries.
Checkbox: Enables boolean input.
Photo Uploader: Allows users to upload images.
Video Uploader: Enables video file uploads.
File Uploader: Allows file uploads.
Dropdown: Provides a drop-down menu for selection.
Multi-select: Allows multiple selections from a list.
Detect Current Location: Captures the user's current geographic location.
Address Finder: Enables users to search for and select addresses.
How to Add a New Component
Adding a new component to a screen in NotionApps involves a few key steps:
Go to any screen, by clicking on a row in a List screen OR by clicking the "Go To Screen" button in the app builder.
Once you're on the desired screen, click on the plus (+) button in the screen configuration section.
In the panel that opens up, you can select a logic based on the field you want to show, and a default component will be added to the screen (which you can customize later). Alternatively, you can select a specific component from the "Components" section and change its field to the desired field.
After adding the component, you can customize its appearance and functionality. Adjust its layout, styling, and behavior to match your app’s design and user experience goals. See the “Update Form” section for a detailed video tutorial.
⚙
There are 25+ components on NotionApps for you to choose from.
Step 4. Customize App: Lists
In NotionApps, you can seamlessly integrate and display data from Notion databases as dynamic lists within your app with row-level access. Utilizing the app builder, you can customize these lists with various features to enhance data visibility and accessibility.
Lists
Lists in your app serve as collections of Notion database items, presenting them in a structured and accessible format. By utilizing list screens like "View Items" and "Update Items," you can effectively access and manipulate database content directly within your app. Whether you need to display a list of tasks, inventory items, or customer records, the builder allows you to customize the presentation and functionality of your lists. To configure a list, follow these steps:
Open your app in the app builder and click on the "+ New Screen" button.
Select the desired Notion database from the dropdown menu.
Choose between the "View Item" or "Update Item" screen types.
Confirm your selection by clicking "Done" to add the screen to your app.
Views
Choose from multiple view types, like list view or grid view, and configure what database properties you want to show in the view like title, description, image, caption, and color tag. Select the view that best suits your team's needs for clear data visibility.
Filtering, Sorting & Visibility
Searching
The intuitive search bar functionality at the top of the screen ensures your team can find the information they need quickly.
Visibility Logic
Sometimes, you may want to show or hide screens based on who is logged in. This is where the Screen Visibility Logic comes in. Suppose we want to show a screen to create a New Task only for Sales Managers but hide it for other employees. See here the step-by-step guide.
In-App Filtering
This feature allows your app users to filter data within your app based on specific criteria. For example, you can filter by "Status" (is equal to In Progress or Completed) and "Completion Date" (is greater than the current date). For more details, you can refer to this guide - ‘In-app-filtering’.
💡
You can also add multiple filter columns if you want to combine the results of different filters.
Sorting
Sorting helps users arrange items in a specific order. You can sort by various properties, such as "Due Date" or "Priority." To add sorting, click on "+ Add Sorting". This will add a default sort that you can customize further with the fields/columns to sort by. You can select the order, either ascending (A → Z) or descending (Z → A), for each field.
Filtering
Filtering allows users to narrow down a list of items based on specific criteria. For example, “Delivered Status” is equal to “Done” and the “Due Date” is “Today.” To add filtering, click on "+ Add Filtering". This will add a default filter condition that you can customize further. You can select a database column, a filter operator, and a value to filter by. You can also apply "and" or "or" logic to the conditions to determine how these conditions are joined together.
Step 5. Customize App: Forms
NotionApps allows you to build form-based apps to add and update data on your Notion databases without coding, ensuring that your database remains accurate and up-to-date.
Forms
In NotionApps, forms are used in screens like "Update Items" and "Add New Item" to facilitate data entry and modifications directly within your app. These form screens can be configured in the builder to meet your app’s specific requirements. You can drag and drop customizable components to gather and display data within these forms. Whether you’re enabling users to update existing records or add new entries, forms are the way to go. Here’s how you can configure and customize forms in NotionApps:
Update Items / Update Form
The "Update Items" screen type in NotionApps allows you to create screens that enable users to update items or pages directly within your app. This feature provides a seamless way to modify data stored in your Notion databases. To create an "Update Items" screen, follow these steps:
Click on the app you want to customize from the home page to open it in the app builder.
Click on the "+ New Screen" button located at the bottom right of the builder.
In the screen configuration, select the desired Notion database you want to update items/pages for.
Choose the screen type "Update Items."
Use the "Go to Screen" button in the screen configuration section, or Click on a specific row within the app preview.
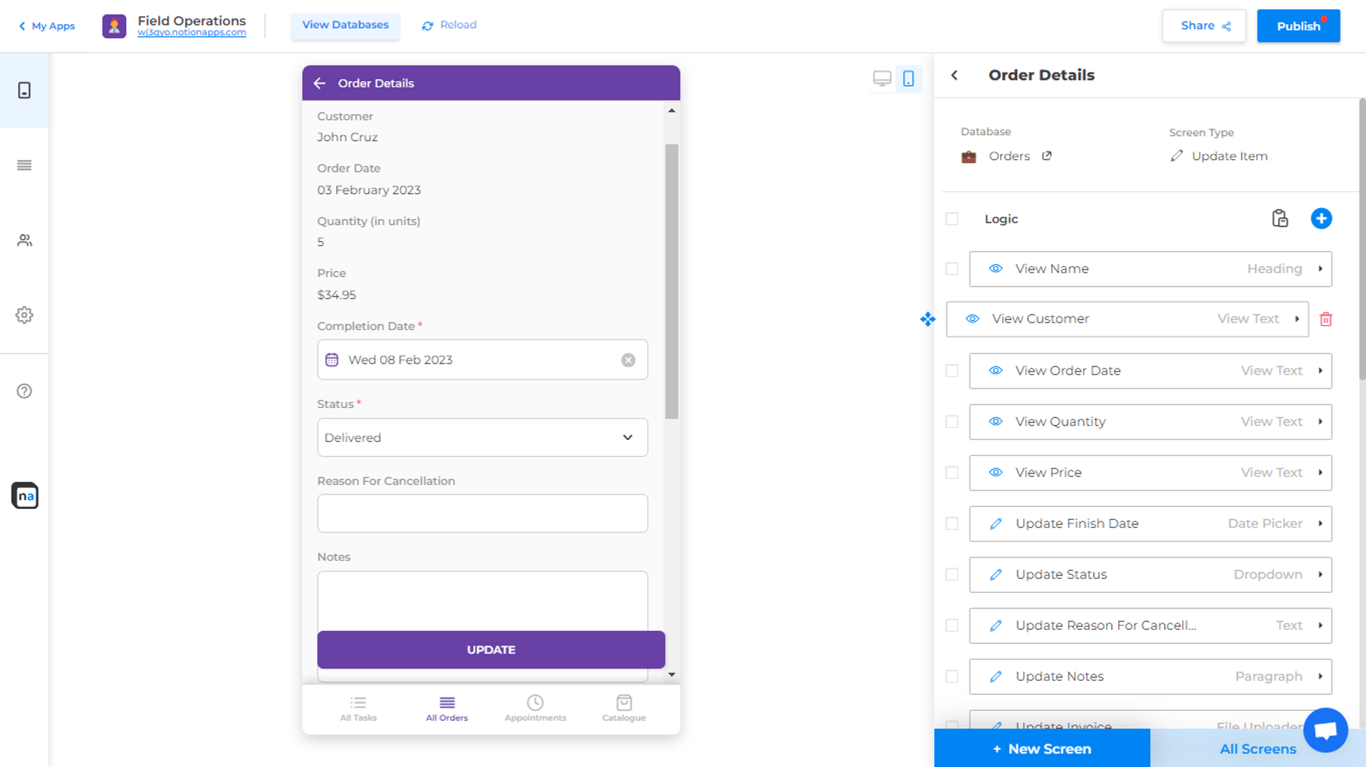
Once you access the "Update Single Item" screen, you can configure it with both "View" and "Update" components to display and modify the properties of the item/page.
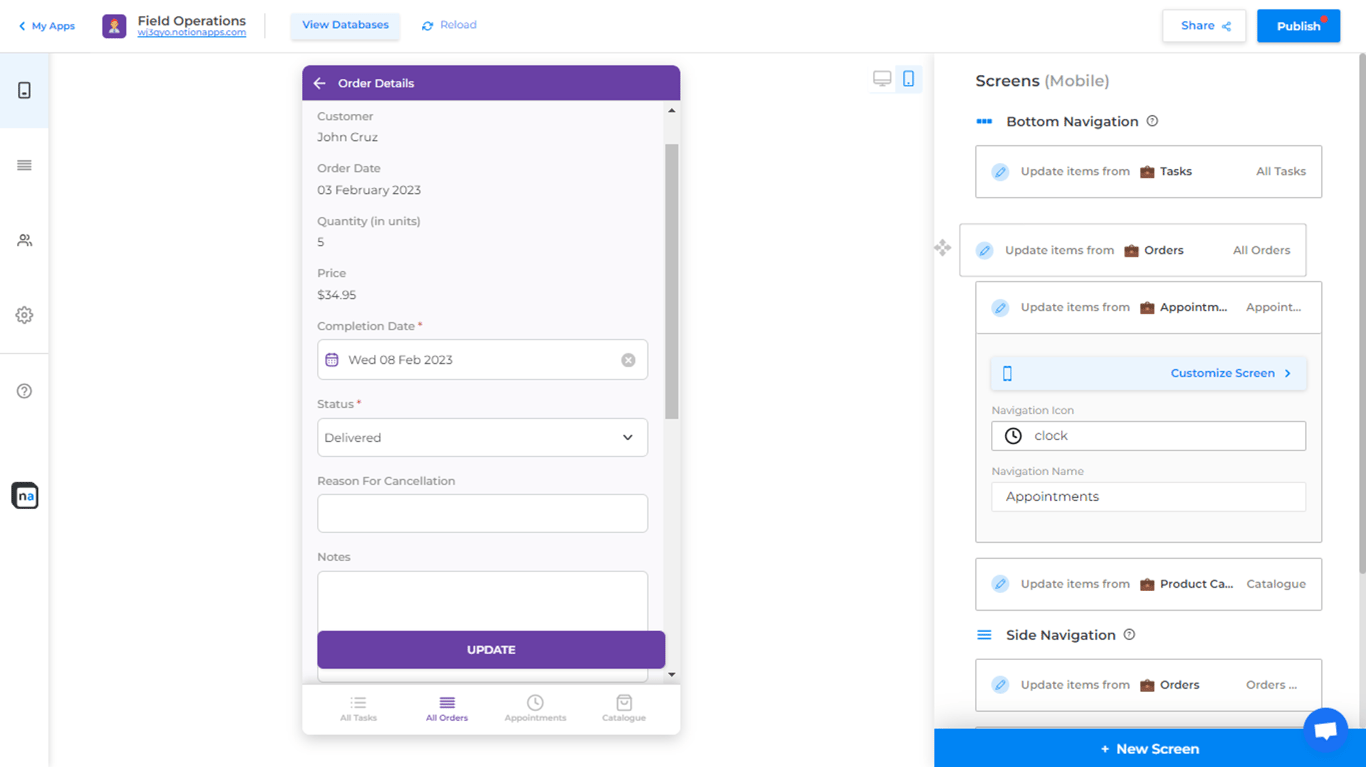
Update Components: These components capture new data or update existing data. For example, you can utilize controls like "Update Order Date," "Update Quantity," or "Update Status" to modify corresponding property values. The image below showcases an example record with editable properties such as "Reason for cancellation," "Invoice," "Completion Date," and "Status." With a few clicks, your team can update these details, including adding attachments like images or documents, as needed, ensuring data stays current and captures the full picture.
View Components: These components in NotionApps allow you to control what database properties are visible on the screen, ensuring your team sees only the most relevant information for their tasks. You can choose to display properties like "Name," "Order Date," "Quantity," "Customer," and more. For instance, here I’ve added the Address Viewer component, which can be an important aspect of field operations. You can also add components like a Contact Card or Link.
Within the configuration of each component, you have additional options:
Set properties as "required" to ensure users provide input for those fields.
Define visibility logic based on other properties, allowing dynamic display or hiding of certain components.
Adjust the type of component to best represent the property, such as using a dropdown, multi-select, file picker, media uploader, text input, or date picker.
Add New Item / Add Form
The "Add New Item" screen type in NotionApps allows you to create screens that enable users to add items or pages directly to your Notion databases from within your app. This screen is useful for adding new items or creating a simple feedback form on NotionApps. The new data reflects on Notion immediately. You can create an "Add New Item" screen in one of two ways:
Either by adding a new screen of type "Add New Item"
Or enable the "Allow Adding" option on a "View Items" or "Update Items" screen.
Update Components: Similar to update forms, add forms can include a variety of update components to capture new data. For example, in a Field app, you might use text inputs for "Client Name," date pickers for "Delivery Date," and file uploaders for "Invoice."
To configure the existing components or add new ones, follow these steps:
Click on the component you want to modify or click the "+" button in the screen configuration section to add a new component.
Adjust the properties of each component, such as the type of input property, label, placeholder, and more.
Once the user fills in the necessary information in the input components and clicks the "Save" button at the bottom of the screen, a new page will be created in the selected Notion database, capturing the submitted data.
In addition to adding data, NotionApps allows you to delete obsolete or incorrect records with ease. You can configure delete actions within your app's layout, such as a "Delete" button. Once triggered, the selected record is permanently removed from your Notion database.
✅
Once submitted within the app, form data automatically populates your Notion database.
Step 5: Users & Data Restriction
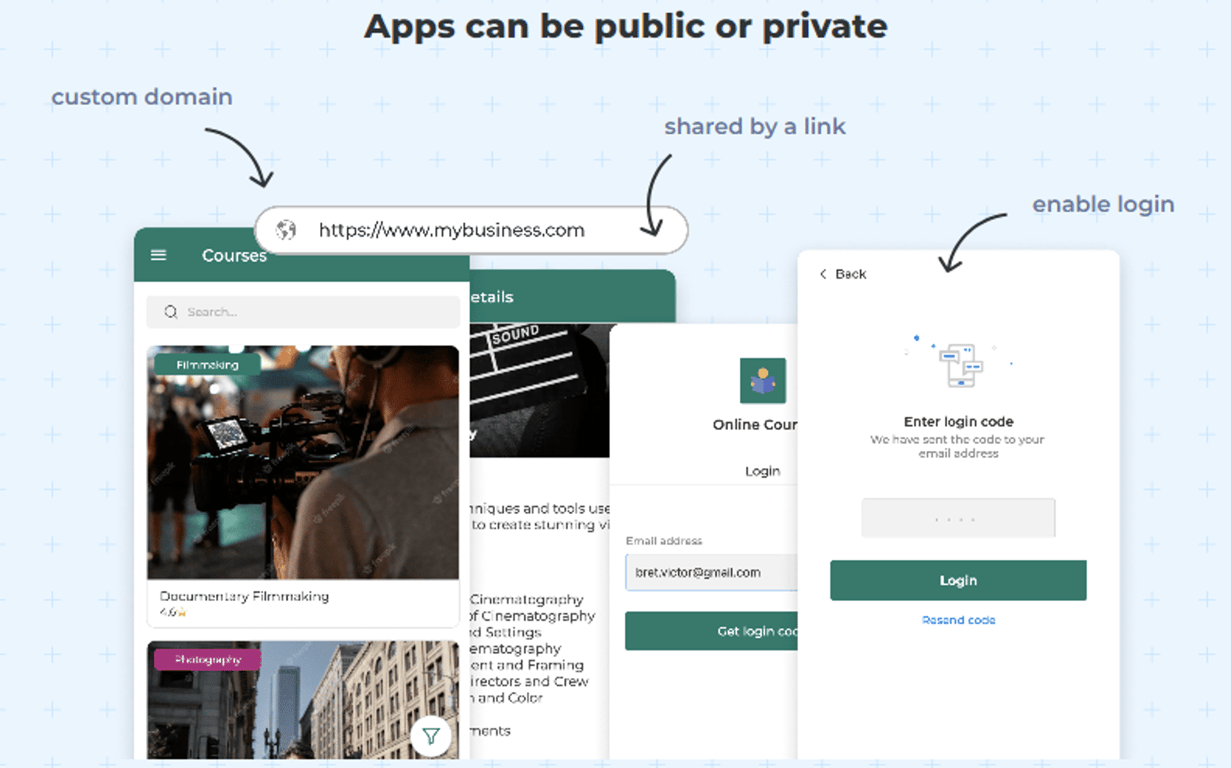
While NotionApps makes data sharing and collaboration easy, it's also crucial to keep certain information private and secure, especially when building apps for your team. Private apps allow you to control who can access the app and what data they can see. Enable login feature is essential for this purpose, as it ensures that only authorized users can enter the app. This is particularly important for field teams, where sensitive information needs to be accessible only to specific team members based on their roles.
For example, User A would see only the items they are assigned to and not anyone else's items.
Introduction to Users
In NotionApps, the Users tab is where you manage who can access your app. By default, apps are public, meaning anyone with the link can view them. To restrict access, you need to enable login, which requires setting up a Users database. This database stores user information, such as email addresses and usernames, allowing you to control who can log in and what data they can see. A Users database is essential for maintaining privacy and ensuring that only authorized users access sensitive information.
Once your Users database is connected, managing users becomes straightforward:
Add Users: Add new users directly to your Users database in Notion. Include their email and name.
Remove Users: To revoke access, simply delete the user's entry from the Users database.
For detailed info on how to create a Users database, refer to this documentation.
Enable Login
In NotionApps, you can create two kinds of applications: public and private. Public applications are accessible to anyone with the link. This is suitable for something like a portfolio or an online product catalog. However, for more internal use cases like Field teams where you want to share data with only a specific set of people, private apps are essential. They allow you to keep data private and only exposed to the people you want.
By default, all apps created on NotionApps are public. You need to manually change them to private. Here’s how to do that:
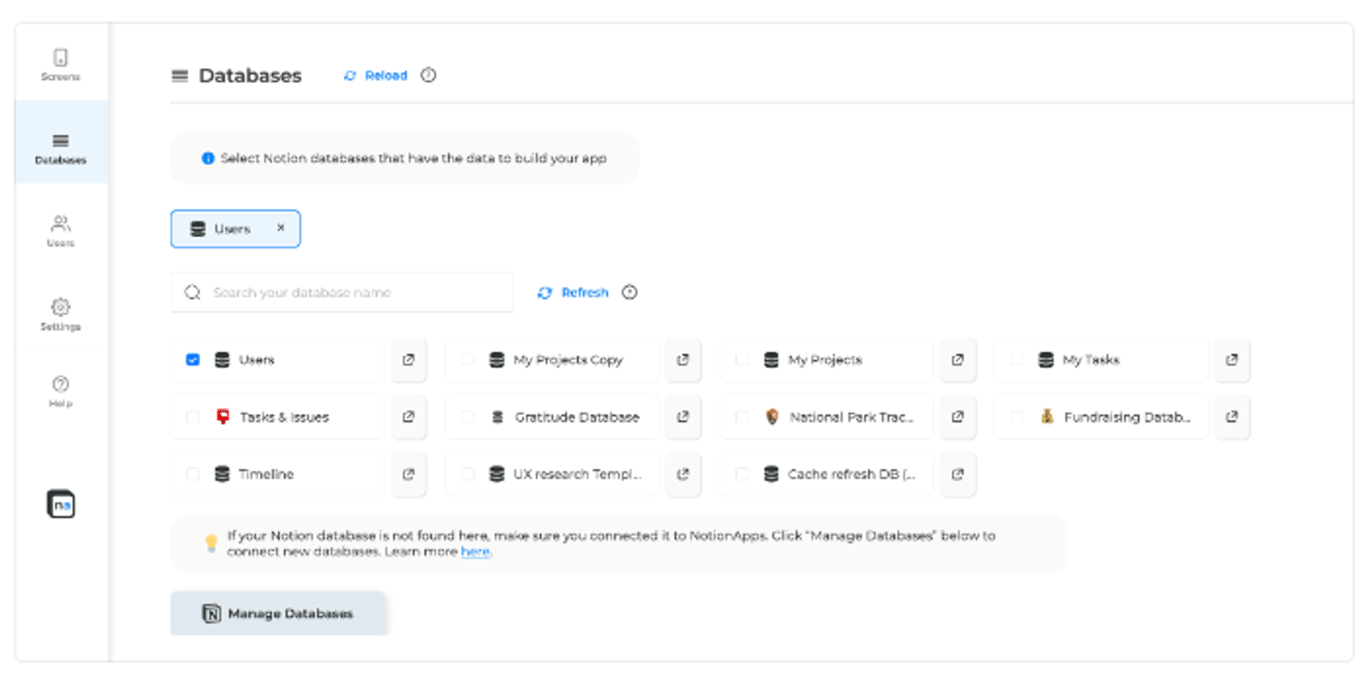
Open the App Builder: First, open the app builder. You’ll see a tab called "Users" on the left-hand side of the App builder.
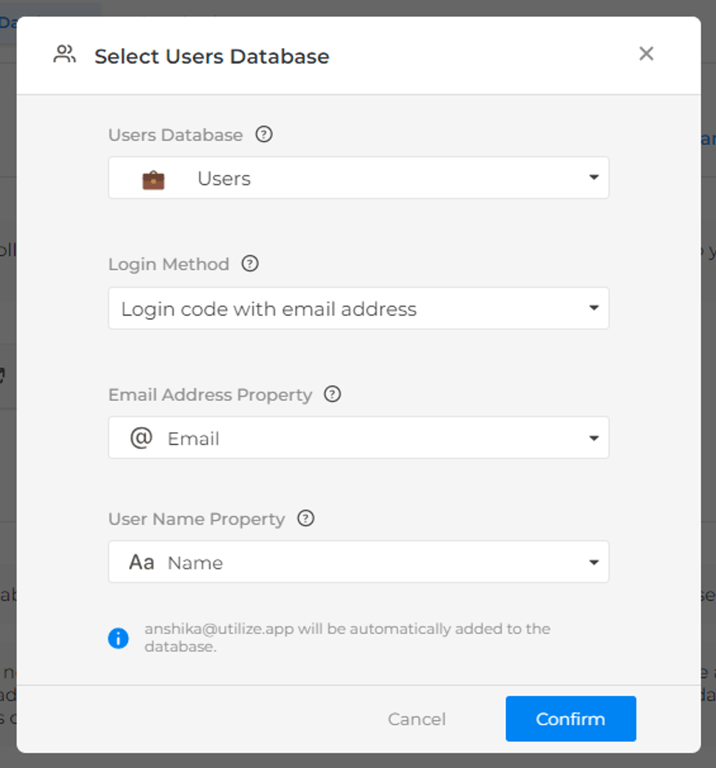
Select a Users Database: To enable login, select a Notion database that has your users’ data (for example, a database of your clients, employees, members, etc). If you do not have a Users database, you can duplicate the sample database. NotionApps supports email-based authentication, where your users' names and email addresses are stored.
Go ahead and create a Users database in Notion. Example: Create an empty page and then create an inline database called "Users". Add a "Name" column and an "Email" column, then enter the relevant details.
Link the Users Database: After creating the Users database, link it to your application in the app builder. This step ensures that the app can use the user data for authentication. Once linked, you should see the Users database listed under the ‘Users’ section.
Configure Login Settings: Specify the email in ‘Email Address’ property and name in ‘User Name’ property while configuring the Users database. NotionApps will use these columns for user authentication.
Publish the App: Your app is now a private application. Publish the app to apply the changes. When users open the app, they will need to log in to access the data. After publishing, open the app in a new tab. You’ll be prompted to log in with the email address. A login code will be sent to the user’s email. Enter the code to access the app.
Data Restriction
In NotionApps, you can manage row-level database restrictions so your users only see the data assigned to them. Limit the rows a logged-in user sees when they open the app.
To restrict data for users, you need to select a data restriction property from your database where you store a relation to the Users database or the email address(es) of the users who can access the data. To assign multiple users to data, link them to the user relation or store them as comma-separated values.
Once your app is private, please follow these steps:
Go to the "Users" tab in the left sidebar of your app builder.
Under the "Data Restriction" section, click on "Add Restriction" next to the database whose data you want to limit.
In the "Add Restriction" popup, select the "Restriction Method" from either "Select Relation to Users Database" (a relation linked to your Users' database) or "Select Property with Email Address".
Select the property based on whose data you'd like to match with the logged-in user.
Click "Confirm".
Publish the app.
Now when a user logs in to the app, they will see only those pages/items of the database where their email ID is present or their data is linked in the user relation property.
❗
It's preferred to filter data using the "Select Relation to Users Database" restriction method.
Step 6: Publish Your App and Share Securely
Once you've customized your app to perfection, it's time to share it with your field team! NotionApps offers several options for publishing and access control, ensuring your data remains secure and accessible to the right people.
Publishing Options:
Shared by Link: This is the simplest option. Generate a shareable link that anyone with the link can access the app. This is suitable for public apps or temporary access needs.
Custom Domain (Optional): Elevate your app's professionalism by assigning a custom domain name (e.g., "yourcompany.notion.app").
Conclusion
In conclusion, transforming your Notion databases into a user-friendly mobile app with NotionApps significantly streamlines operations for your team, especially those working in the field or in deskless environments. With its intuitive drag-and-drop builder, real-time data syncing, and customizable components, NotionApps allows you to create a seamless and efficient user experience.
Whether you're managing tasks, tracking inventory, or coordinating field operations, the ability to access and update data on any platform—web, Android, or iOS—ensures your team remains productive and organized. NotionApps is mobile-friendly and works flawlessly across all platforms, providing the flexibility and accessibility your team needs.
NotionApps is "the missing piece of Notion" because it empowers users to build app experiences for clients and other stakeholders without sharing Notion pages directly. This capability offers a professional and controlled way to collaborate with teams and external parties who cannot access Notion directly.
✅
Follow us on Linkedin and X for more tips and tricks on using NotionApps to optimize your field operations.
Notion Sites allow you to turn your Notion pages into a fully functional website with ease. Whether you’re a beginner or an advanced Notion user, this guide will help you build a sleek, professional-looking site using Notion in just a few minutes.
This ultimate guide explains how to embed Google Calendar in Notion using various methods. Improve your organizational skills and manage your tasks seamlessly within Notion.